
Aghanim's Labyrinth: The Continuum Conundrum is a gauntlet style event game mode available during the winter of 2021. It is the continuation to Aghanim's Labyrinth, where teams of four must battle their way through a series of monster-filled rooms of the Continuum Vault to reach the boss, The Primal Beast, at the request of Aghanim himself to save an alternate version of himself.
Gameplay[]
- Teams of four enter a dungeon with several possible rooms. Finish the objectives of the room to move onto the next. Complete 17 rooms to beat the level.
- Each player has a set number of lives. Upon dying, players automatically resurrect after 10 seconds. Dead teammates cannot be revived.
- All dead players are automatically resurrected when a room is cleared.
- The game ends when all players are out of lives and dead.
Heroes[]
- 14 heroes with modified abilities are available for this game mode.
- Additional 15 heroes from last year's Aghanim's Labyrinth are unlockable through Blessings and can be randomly unlocked on certain level rewards in the Battle Pass.
| Strength | Agility | Intelligence |
|---|---|---|
- Heroes with an asterisk (*) are not playable initially and must be unlocked.
Abilities[]
- Heroes have some modified or completely different abilities, either to better fit this game mode or for balance reasons
| Hero | Ability | Description | Talent Changes |
|---|---|---|---|
| Dawnbreaker | Starbreaker |
| |
| Celestial Hammer | |||
| Luminosity | Adjusted values
| ||
| Solar Guardian | |||
| Kunkka | Torrent | ||
| Tidebringer | |||
| X Marks the Spot | Changes armor and movement speed of the target (allies gain, enemies lose). Can disable auto-return by disabling autocast.
| ||
| Ghostship | Adjusted value
| ||
| Magnus | Shockwave |
| |
| Empower | |||
| Skewer | Now skewers all enemies (not just heroes) | ||
| Reverse Polarity | |||
| Mars | Spear of Mars |
| |
| God's Rebuke | |||
| Bulwark | Has a maximum duration and a cooldown
| ||
| Arena Of Blood | |||
| Omniknight | Purification | Instantly heals an allied unit and damages all enemy units near them
|
|
| Heavenly Grace | Grants Damage Reduction instead of Status Resistance
| ||
| Degen Aura | |||
| Guardian Angel | Value Adjusted
| ||
| Phoenix | Icarus Dive | Values Adjusted
|
|
| Fire Spirits | Values Adjusted
| ||
| Sun Ray | Deals fixed damage to enemies (still heals allies for a base amount plus a percentage of their health)
HP cost occurs immediately
| ||
| Supernova | Number of attacks to destroy greatly increased, but can be damaged by all units
| ||
| Sand King | Burrowstrike | ||
| Sand Storm | Blinds and slows enemies as well as damages, but no longer provides invisibility
| ||
| Caustic Finale | Affected enemies also take damage every 0.5 seconds
Explosion deals flat damage
| ||
| Epicenter | |||
| Snapfire | Scatterblast |
| |
| Firesnap Cookie | |||
| Lil' Shredder | |||
| Mortimer Kisses | Adjusted value
| ||
| Tusk | Ice Shards |
| |
| Snowball | |||
| Tag Team | |||
| Walrus PUNCH! | |||
| Undying | Decay | Deals damage to all enemies in an area, gaining strength for each enemy.
Strength gain increased when hitting Captains and Bosses
|
|
| Soul Rip | |||
| Tombstone | Adjusted values
| ||
| Flesh Golem | Adjusted values
| ||
| Clinkz | Burning Barrage |
| |
| Searing Arrows | Slows the attack speed of enemies hit for 1.5 seconds
| ||
| Skeleton Walk | Gives bonus magic resistance in addition to movement speed and invisibility
| ||
| Burning Army | Summons 5 skeleton archers (current aghs ability)
| ||
| Drow Ranger | Frost Arrows |
| |
| Gust | |||
| Multishot | |||
| Marksmanship | Gives bonus agi to ranged allied heroes in a radius. Does not pierce or grants bonus damage passively
Also has an active component to increase attack range and damage for a fixed number of attacks | ||
| Gyrocopter | Rocket Barrage |
| |
| Homing Missile | Can no longer be destroyed by enemies
Now launched in .5 of a second
| ||
| Flak Cannon | Hits a specified number of additional targets instead of all enemies
| ||
| Call Down | |||
| Juggernaut | Blade Fury |
| |
| Healing Ward | Releases 1 healing pulse per second for 6 seconds
Effects are halved on allies
| ||
| Blade Dance | |||
| Omnislash | |||
| Luna | Lucent Beam | ||
| Moon Glaives | |||
| Lunar Blessing | Has an active component to turn day into night and grants bonus damage to Luna and allies at night | ||
| Eclipse | No longer has a limit of beams per unit
| ||
| Slark | Dark Pact | Now heals Slark for a percentage of the damage dealt (instead of dealing damage to himself)
|
|
| Pounce | Deals damage to every enemy Slark comes in contact with
Leashes the first Captain he connects with
| ||
| Essence Shift | Now decreases hit enemies' outgoing damage to convert them to bonus agility
Can be activated to convert stacks to bonus Agility for a short duration, resetting the stacks
| ||
| Shadow Dance | Bonus Movement Speed and Health Regeneration only occurs when active
No longer has a passive component | ||
| Sniper | Shrapnel | ||
| Headshot | |||
| Take Aim | |||
| Assassinate | |||
| Templar Assassin | Refraction | Each instance of refraction absorbs a limited amount of damage before being consumed, letting the rest of the damage through
|
|
| Meld | Only invisible for up to 2.5 seconds
| ||
| Psi Blades | |||
| Psionic Trap | Psionic Trap can no longer be activated manually, and detonates after 1.5 seconds.
Slowing influence raised to 40% at all levels. | ||
| Ursa | Lua error in Module:Ability_ID at line 61: Could not find Cargo data for "Earthshock". | ||
| Lua error in Module:Ability_ID at line 61: Could not find Cargo data for "Overpower". | |||
| Lua error in Module:Ability_ID at line 61: Could not find Cargo data for "Fury Swipes". | Values adjusted, capped at 6 seconds
| ||
| Lua error in Module:Ability_ID at line 61: Could not find Cargo data for "Enrage". | |||
| Viper | Poison Attack | Adjusted values
|
|
| Nethertoxin | |||
| Corrosive Skin | |||
| Viper Strike | |||
| Weaver | The Swarm | Adjusted values
|
|
| Shukuchi | Now grants bonus movement speed, might not reach 550 at lower levels
| ||
| Geminate Attack | |||
| Time Lapse | |||
| Bane | Enfeeble | Reduced values, effects are halved on boss enemies
|
|
| Brain Sap | |||
| Nightmare | Enemies can now be damaged by allies without waking them up
Allied heroes can wake themselves up (after the invulnerability period) by issuing a command
| ||
| Fiend's Grip | |||
| Disruptor | Thunder Strike |
| |
| Glimpse | Affects all enemies (not just heroes) in an area
Fires an attack that deals bonus damage to all targets hit by Glimpse
| ||
| Kinetic Field | |||
| Static Storm | Adjusted value
| ||
| Lich | Frost Blast |
| |
| Frost Shield | |||
| Sinister Gaze | Restores a percentage of max mana instead of draining
Now affects all enemies in a radius, and lets you cast your other abilities while channeling (same as the Aghs upgrade)
| ||
| Chain Frost | Adjusted value
| ||
| Lina | Dragon Slave | ||
| Light Strike Array | |||
| Fiery Soul | Fiery Soul is now an active ability, granting attack and movement speed for a duration
Still based on stacks of Fiery Soul that are added each time Lina casts a spell (up to 3 times)
| ||
| Laguna Blade | |||
| Queen of Pain | Shadow Strike |
| |
| Blink | |||
| Scream of Pain | |||
| Sonic Wave | |||
| Void Spirit | Aether Remnant | The remanent pulls the target in along with other units within 130 radius of the pull
|
|
| Dissimilate | Adjusted value
| ||
| Resonant Pulse | Gains increase damage reduction for all units hit
Damage reduction gain increased when hitting Captains and Bosses
| ||
| Astral Step | Adjusted values
| ||
| Winter Wyvern | Arctic Burn | Arctic Burn now deals flat damage over time, but is no longer limited to 1 application per unit
|
|
| Splinter Blast | |||
| Cold Embrace | |||
| Winter's Curse | Does not make the target immune to damage from Wyvern or allies | ||
| Witch Doctor | Paralyzing Cask | Deals the same damage & stun to all enemies (no longer deals less to heroes)
|
|
| Voodoo Restoration | |||
| Maledict | Affects all enemies (not just heroes)
Damage burst has a damage cap
| ||
| Death Ward | Attacks all enemies (not just heroes)
Bounces twice by default
|
Scepter Shards[]
- Scepter Shards are obtained by clearing rooms. They allows heroes to pick one of three random upgrades for their abilities.
- At the start of the exploration of the Continuum Vault, you are given option between three Legendary Shards, which give unique traits to an ability, or in certain heroes, may give an entirely new ability.
- Normal Rooms drop Common Shards, which give minor buffs to the hero or an ability's existing stats.
- Elite Rooms and Trap Rooms drop Elite Shards, which give buffs that are twice as potent as Common Shards.
- Boss Rooms drop another Legendary Shards.
- This table shows all Legendary upgrades. Common upgrades are not shown. Crossed out upgrades were removed.
| Hero | Ability | Upgrade | Description |
|---|---|---|---|
| Dawnbreaker | Starbreaker | Stand Ablaze | Starbreaker creates trails of your current level of Celestial Hammer fire when impacting an enemy.
This fire debuff stacks with other sources of Celestial Hammer fire. |
| Counter Orbital | When attacked, Dawnbreaker has a 17% chance to counter attack with a swipe of Starbreaker. The normal charged-up attack of Luminosity has a 33% chance to be a Starbreaker smash. | ||
| Sun Crusher | Starbreaker gains the ability to turn, movement speed equal to 25% of her current movement speed, and swings 35% faster. Dawnbreaker is magic immune for the duration | ||
| Celestial Hammer | Hammer Time | Celestial Hammer gains 3 charges. Your Starbreaker smash is triggered when the Hammer lands, and Converge becomes point targeted, allowing you to choose which hammer to converge to. | |
| Sun Forge | Celestial Hammer now creates a moving trail of fire between it and Dawnbreaker until recalled, and lasts an additional 3 seconds in the world before automatically returning. | ||
| Haven | While in the world, Celestial Hammer pulses at 50% of your current Solar Guardian radius and heal / damage. | ||
| Luminosity | Solar Battery | Dawnbreaker gains bonuses up to 25% movement speed and 75 attack speed while Luminosity has any active stacks, reaching the maximum when Luminosity is fully powered up. | |
| Bright Foundry | Dawnbreaker's attacks passively apply 1 second(s) of Celestial Hammer fire debuff. The charged up attack of Luminosity launches your current level of Celestial Hammer in Dawnbreaker's facing direction. This fire debuff stacks with other sources of Celestial Hammer fire. | ||
| Light Bringer | Luminosity may be activated to fully charge for 5 seconds. Cooldown: 60, Mana Cost: 100. | ||
| Solar Guardian | Sun Sentinel | Upon landing, Dawnbreaker and all allies in Solar Guardian's radius gain 3 seconds of magic immunity and fully charged Luminosity attacks. | |
| Death of a Star | Whenever Solar Guardian is cast, all non-primary targets have 50% Solar Guardian pulses created around them until Dawnbreaker lands. When dying, Dawnbreaker automatically casts Solar Guardian on the lowest health ally (herself if no others alive). | ||
| Solar Flare | Upon landing, all enemies inside Solar Guardian's area are knocked back and receive the current level of Celestial Hammer fire debuff for 6 seconds. This fire debuff stacks with other sources of Celestial Hammer fire. | ||
| Kunkka | Torrent | Squall | Each cast of Torrent creates additional Torrents in a line starting from Kunkka, scaling up in power and damage until they reach the target position. |
| Marked | Enemies hit by a Torrent have X-Marks the Spot applied to them. | ||
| Tidebringer | Tsunami | Tidebringer triggers a V-shaped tidal wave for 60% of Tidebringer's range, dragging enemies along its wake and dealing 20% of Tidebringer's damage. | |
| No Quarter | Tidebringer gains 2 charges. Each enemy cleaved by Tidebringer grants Kunkka 5% additional movespeed and 5% additional damage for 5 seconds. Stacks up to 10 times. | ||
| X Marks the Spot | Grog Blossom | upon recalling from X-Marks the Spot, Admiral's Rum is splashed on nearby allies in a 600 radius around the recalled unit. | |
| Seal Legs | Allies affected X-Marks the Spot fire a 60% strength Torrent every 300 range they move. | ||
| Dread Pirate | When cast on an enemy, X Marks the Spot fears it away from Kunkka, triggering a Tidebringer attack on start and end of the effect. Lasts 50% of the duration on enemy captains. | ||
| Ghostship | Fire Cannons | Ghostship fires cannons on both sides as it moves, dealing 25% of Ghostship's damage but full stun duration. | |
| Rumboldened | Admiral's Rum grants spell immunity for 3 seconds. | ||
| Skull n' Bones | When Ghostship crashes, it will fire off a Torrent within 300 range of the crash site every 0.25s for 3 seconds. | ||
| Davy Jones' Locker | Ghostship creates a whirlpool at the crash location that applies Admiral's Rum to allies in a 400 radius every second for 7 seconds. | ||
| Magnus | Shockwave | Triwave | Shockwave now fires 3 shockwaves. Secondary shockwaves deal 50% less damage. |
| Shock and Awe | Enemies hit by Shockwave deal 75% less damage for 2.5 seconds. | ||
| Shockarang | Shockwaves launch a secondary Shockwave in the opposite direction after reaching their maximum distance. | ||
| Empower | Empower has no target requirement and is applied to all allies. | ||
| Over-Empower | Empower has 2 charges. Allies also receive Magnus's self damage and cleave multiplier. | ||
| Vampower | Empowered attacks now have 10% lifesteal. | ||
| Too Many Waves | Empowered attacks now have a 20% chance to cast Magnus's Shockwave. | ||
| Skewer | Lowers cooldown, cast point, and mana cost on Skewer. | ||
| Allows Magnus to push friendly heroes out of danger. | |||
| Magnus heals allies hit for 60% of skewer's damage. The allies are not moved. | |||
| Bulldoze | Magnus gains 7 strength per target skewered for 20 seconds. | ||
| Toss Away | Magnus preforms a Horn Toss at the end of the skewer, dealing 50% of skewer's damage to all enemies hit. | ||
| Blast Off | Magnus attacks each enemy as he skewers them. | ||
| Reverse Polarity | Reverse Polarity's radius is increased to 820. | ||
| Reverse Reverse Polarity | Magnus reverses Reverse Polarity, gaining an additional ability that flings out enemies away from him instead of pulling them in, applying the damage and stun of Reverse Polarity. | ||
| Dematerialization | Allies' attacks critically strike enemies stunned by Reverse Polarity for 300% damage. | ||
| Extra Polarity | After casting Reverse Polarity, Magnus's movement speed is increased by 100% and his attack speed is increased by 150 for 15 seconds. | ||
| Mars | Spear of Mars | Shish Kebab | Spear can impale up to 7 enemies at once. |
| Boomstick | Spear explodes in a 450 radius at its destination, dealing an additional instance of its current damage. | ||
| Trail Blazer | Spear leaves a burning trail in its wake. The trail lasts for 4 seconds and burns enemies for 20% of Spear's damage every 0.5 seconds. | ||
| God's Rebuke | Full Circle | God's Rebuke deals damage in a full circle around Mars. | |
| Stunning Rebuke | God's Rebuke stuns enemies for 2 seconds. | ||
| Strong Arguement | God's Rebuke grants Mars 4 strength for 10 seconds for each enemy hit. | ||
| Bulwark | Retort | During Active Bulwark, Mars has a 17% chance to counter attack with God's Rebuke if attacked from the front. | |
| Bastion | Every 1.1 seconds of Bulwark being active, Mars gets an additional charge, up to 3 total. When Bulwark is turned off, Mars releases a Spear for each charge, in a semi-circle in front of him. | ||
| Phalanx | When activating Bulwark, Mars summons 3 invulnerable and unmovable soldiers next to him. Soldiers have an attack range of 300, and deal 25 + 30% of Mars's Base Attack Damage with each hit. Soldiers last for the full duration of Bulwark. | ||
| Arena Of Blood | Anyway, Here's Spearwall | Soldiers in the Arena of Blood also attack enemies up to 250 units outside the arena. | |
| Remote Workplace | Arena of Blood has a global cast range, and a 25% cooldown decrease. | ||
| Colosseum | Allies inside the Arena gain 35 bonus damage and 25 bonus attack speed. | ||
| Omniknight | Purification | Holy Place | Purification now heals all friendly units in a 250 area of effect. |
| Benevolence | Purification now has 2 charges. | ||
| Stalwart | Every time Omniknight takes damage, Purification Cooldown is decreased by 0.2 seconds. | ||
| Blessed Cure | Purification has a 50% chance to affect the target twice. | ||
| Heavenly Grace | Heavenly Purification | Heals the target with the current level of Purification when Heavenly Grace is cast. | |
| Zeal | Heavenly Grace amplifies damage dealt by the affected unit by 30%. | ||
| Heavenly Barrier | Heavenly Grace blocks 5 instances of damage on the targeted ally. | ||
| Judgement | Heavenly Grace knocks back enemies within 400 of the target on cast, and deals damage equal to 150% of Omniknight's base attack to the affected enemies. | ||
| Degen Aura | Righteous Path | Degen Aura also affects allies, increasing their movement and attack speeds by 50% of the Degen Aura values. | |
| Condemnation | Degen Aura damages enemies in its area of effect for 25% of Omniknight's base attack damage every 0.75 seconds. | ||
| Absolution | Enemy units that die within Degen Aura's area of effect restore 4% of Omniknight's max Health and Mana. | ||
| Guardian Angel | Heal Life Angel | Any time a unit affected by Guardian Angel is attacked, there is a 20% chance that the unit will be healed by Omniknight's current level of Purification. | |
| Angelic Flight | Guardian Angel gives 30% magic resistance and flight for it's duration. | ||
| Personal Savior | Omniknight gains a separate ability, allowing him to cast his current level of Guardian angel on a single target. Mana cost is reduced by 50 percent. | ||
| Phoenix | Icarus Dive | Savior | The first allied hero Phoenix collides with during Icarus Dive is carried along and receives an instant heal for 10x Sun Ray's base heal per second. Units are invulnerable during the dive, and afterwards receive persistent invulnerability for 4s. Icarus Dive's autocast can be toggled off to disable the ally-saving behavior. |
| Blast Wave | At the end of Icarus Dive, Phoenix generates a blast that deals 400% of Icarus Dive's DPS as an instance of damage in 400 radius, applies Icarus Dive's debuff, and knocks enemies back 350 units. | ||
| Binary Star | Icarus Dive generates a half-radius Supernova at the destination that lasts 3s. This sun does not restore Phoenix's health and mana or refresh its cooldowns. | ||
| Fire Spirits | Spirit Balm | Fire Spirits affect allies in their impact radius, healing them over time. The heal amount is 50% of Fire Spirits' damage per second. Additionally increases Fire Spirits' travel speed by 450. | |
| Permeation | Launched fire spirits apply their debuff to enemies they pass through. The first enemy struck is carried by the spirit to its destination. | ||
| Flame Revenant | Fire spirits leave a flame revenant where they land. The revenant damages units with an aoe flame attack whose dps is 75% of Fire Spirit's dps. Applies 15% movement slow. Each flame revenant's lifetime is 2x Flame Spirit's debuff duration and its attack range is 2x Fire Spirits' radius. | ||
| Sun Ray | Luminance | Allies affected by Sun Ray are strong dispelled and granted 400% of Sun Ray's base heal as bonus attack speed. Heroes can only be dispelled once each per Sun Ray cast. | |
| Focus Point | The tip of the Sun Ray deals 200% more damage and heals for 150% more. | ||
| Gamma Ray | Allows Sun Ray to be cast during Supernova and causes it to directly apply the Fire Spirits burn to enemies | ||
| Supernova | Capture | Supernova can target an allied hero to bring it with Phoenix into the sun. If the sun survives, both heroes are restored. If the sun dies, both heroes die. | |
| Horizon | Supernova pushes units back towards its outer edge and applies Icarus Dive's burn. | ||
| Expel Core | Supernova launches Fire Spirits towards enemies in its radius. The amount launched is equal to Fire Spirits' spirit count. It prioritizes nearby enemies and enemies that aren't currently affected by Fire Spirits. | ||
| Sand King | Burrowstrike | Channeled Burrow | Sand King retreats underground for up to 3 seconds, becoming invulnerable and powering up his burrowstrike. When the channel is over, the burrowstrike deals up to 3 times more damage, depending on the duration of the channel. |
| Transport Burrow | Any enemies struck by Burrowstrike are taken with Sand King to his destination | ||
| Undo Burrow | For 1.5s after casting Burrowstrike, Sand King can re-cast it, burrowstriking back to his original location. | ||
| Sand Storm | Independent Storm | Sand King can leave his sand storm without it being destroyed | |
| Field of Impale | Every 0.4s a mini-Burrowstrike with an AoE of 75 is created randomly within the sandstorm, impaling and stunning enemies for the current values of BurrowStrike. | ||
| Vacuum Storm | And time a Sand Storm is created, it sucks enemies into the far edge of the Sand Storm in front of Sand King, and applies the Caustic Finale debuff on all of them. | ||
| Caustic Finale | Final Sand Storm | Whenever Caustic Finale is triggered it creates a Sand Storm that lasts for 6 seconds that is 0.5 the size of a regular Sand Storm. | |
| Active Caustic | Caustic Finale becomes an active ability with a 22 second Cooldown. When activated, Caustic Finale will cause an explosion that deals 50% of Caustic Finale's damage on every attack. Active duration is the same as Caustic Finale's debuff duration. | ||
| Caustic Strength | Every time Sand King appplies the Caustic Finale debuff, his strength is increased by 10% for 8 seconds. | ||
| Epicenter | Epicenter on the Move | If there are enemies nearby, every 600 that Sand King moves creates a pulse of Epicenter | |
| Pancenter | On cast, an Epicenter that deals 30% damage is created around each allied hero | ||
| Defensive Epi | Allies within the Epicenter range gain 80% damage resistance and 50% status resistance for the duration of the Epicenter. | ||
| Snapfire | Scatterblast | Tripple-barreled | Scatterblast has 3 charges. |
| Stopping Power | Scatterblast knocks enemies hit 300 units back, and applies a firespit debuff based on the current level of Mortimer Kisses. | ||
| Sawed-Off | Along with the main blast, Snapfire fires two additional volleys of Scatterblast to her sides. | ||
| Firesnap Cookie | Baker's Dozen | Snapfire gives Firesnaps to all targets in a 300 area around her main target. Only the main target hops forward, secondary targets hop in place. The initial cookie flies 50% faster. | |
| Raisin Firesnaps | Firesnsaps now cause the current level of Mortimer Kiss to be created at the landing destination, and can be fed to enemies, causing them to jump in place. | ||
| Freshly Baked | Firesnaps give allies 250 Bonus Attack Range (ranged only) and 50 Attack Damage for 6.5 seconds. | ||
| Lil' Shredder | Explosive Shells | Lil Shredder attacks deal damage in a 150 radius. | |
| Lil Friendly Shredder | Lil Shredder can be cast on allies. | ||
| Ricochet | Lil Shredder attacks bounce to an additional 3 targets within a 500 range. | ||
| Mortimer Kisses | Fragments of Kisses | Kisses explode on impact, sending 6 fragments into an area 300 around the initial area. | |
| Autocannon | When Mortimers Kisses are active, Snapfire blasts enemies within 450 range with Scatterblast every 1 second(s). | ||
| Safety First | When Mortimer Kisses are active, Snapfire takes 80% less damage. | ||
| Tusk | Ice Shards | Ice Shard Extension | Grants 2 charges. The Ice Shard projectile continues past the cast target, dealing damage to enemies up to 2000 units away. Ice shards will still be created in the usual place. The extension projectile will deal an additional 200 of Ice Shard's damage (values are not stated through ability description). |
| Icebreaker | Each shard explodes eery 0.75 seconds in a 250 radius, dealing 40% of the Ice Shard initial damage for the duration of the shards. | ||
| Iceball | When Ice Shards are created, a Snowball is launched back toward Tusk, hitting any enemies on its way. | ||
| Snowball | Snow Fort | All allies inside the Snowball gain an additional 4% Max health as regen per second | |
| Snowball Blast | At the end of the Snowball, all enemies within a 450 area of the end receive an additional burst of Snowball damage. | ||
| Global Cooling | Snowball has global cast range and ally units can be added into the snowball from anywhere. Max travel duration is not increased. | ||
| Tag Team | Cool Party | Allies hitting an enemy affected by Tag Team gain 8% lifesteal. | |
| Tag, You're In | Tag Team can now be toggled on or off and has no duration, but drains 15 mana per second. | ||
| Local Cooling | Any enemy that dies while affected by Tag Team lowers the cooldown of Tusk's abilities by 1 seconds. | ||
| Walrus PUNCH! | And Another Punch! | If an enemy is killed by Walrus Punch, its cooldown is refreshed. | |
| Tusky-Duskie | Upon landing from Walrus Punch, all enemies within 300 radius of the landing zone take 50% of the initial punch damage. | ||
| Walrus Wallop | Walrus Punch knocks back enemies up to 600 units. When the unit collides with another enemy, that enemy also takes a 25% weaker crit damage and recieves a weaker knockback, continuing the effect on units it hits. A unit can only be hit once per use of Walrus Wallop. | ||
| Undying | Decay | Bring Out the Dead | Spawn a zombie next to each enemy hit by Decay. |
| Rotting Mitts | Gives Undying a 22% chance to cast Decay after a successful attack. | ||
| Macabre Reverberations | Decay triggers 2 additional times at the targeted location 3 seonds apart. The additional Decays deal 50% damage and steal 50% strength. | ||
| Soul Rip | Goading Totem | Soul Rip can now be ground targeted to spawn a Goading Totem. The totem lives for 4 seconds and taunts enemies to it every 1 seconds. When the totem expires it damages enemies and heals allies for 50% of Soul Rip's cumulative value in a 350 area. Toggling Auto Cast will always ground target. | |
| Rip and Tear | Every nearby unit that loses health from Soul Rip has a 50% chance to spawn a zombie. These zombies attack random nearby enemy targets. | ||
| RIPPED | Casting Soul Rip on an allied hero shares 20% of Undying's current Strength for 12 seconds. Casting Soul Rip on an enemy deals additional damage equal to 100% of Undying's current Strength. | ||
| Tombstone | The Dead Hunger | Undying gains an additional ability that allows him to instantly consume all of his zombies, healing for 5% of his max health per zombie and gaining 10% movement speed and 15 attack speed per zombie. | |
| Ripened Corpses | 25% of Zombies spawned are Ripe. When a Ripe zombie successfully attacks it explodes, triggering a Decay at its currently location with 50% of the base Decay radius. | ||
| Bury the Living | Tombstone can now house one hero, protecting them inside and healing them for 2.5% of their max health every 0.5 seconds. | ||
| Flesh Golem | Death March | Undying continuously spawns zombies to attack nearby enemies while Flesh Golem is active. | |
| Rejuvinating Rot | Undying heals for 4% of his maximum health whenever an enemy dies within 500 units while Flesh Golem is active. | ||
| Smash | Flesh Golem attacks damage enemies in a 350 unit radius for 50% damage while also applying Flesh Golem's slow and damage amplification. | ||
| Clinkz | Burning Barrage | Splitfire | Burning Barrage arrows split off into three shots on the first enemy they hit. Increases Burning barrage arrow damage by 10%. |
| Withering Onslaught | Skeleton archers launch a short Burning Barrage at the first enemy they attack. The number of arrows fired is 50% of Clinkz's Burning Barrage's arrows. | ||
| Singe | Each Burning Barrage arrow applies a stunning knockback followed by 100% movement slow for 1s. | ||
| Searing Arrows | Ignite | Each searing arrow applies a 1.5s burn whose damage per second is 100% of Searing Arrows' bonus damage. | |
| Skeletal Colossus | Grants a new ability: Skeletal Colossus. Clinkz summons a massive sword-wielding skeleton. It uses Clinkz's attack damage values and has cleaving attacks that apply Searing Arrows. The colossus will attack units it can see within 2000 range and it cannot be given commands. Cooldown: 120, Mana Cost: 150. | ||
| Melter | Each searing arrow reduces the target's armor by 1. The max stack count is 25% of Searing Arrows' attack speed slow. | ||
| Skeleton Walk | Beckon Undead | Leaving Skeleton Walk creates 2 Burning Army skeleton archers. | |
| Wraith Touch | While in Skeleton Walk, Clinkz steals a portion of damage from enemies he passes through. The attack damage stolen is 25% of Skeleton Walk's bonus movement speed. The buff lasts for 14s after Clinkz breaks his invisibility. Max bonus damage: 150. | ||
| Strafe | Leaving Skeleton Walk grants 400% of Skeleton Walk's movement speed as bonus attack speed. Additionally grants 100% evasion against ranged attacks. Lasts 7s. | ||
| Burning Army | Entrenchment | Each skeleton has a charred region around it that grants lifesteal to Clinkz equal to 50% of Burning Army's damage percentage. Applies 40 attack speed slow to enemies in the area. | |
| Giant Skeletons | Skeleton archer arrows hit 3 additional enemies in 350 radius around the target, applying movement slow equal to half of Searing Arrows' bonus damage for 1.5s. The skeletal colossus applies 0.5s stuns with its cleave attacks. | ||
| Staggerbones | Upon spawning, Clinkz's skeletons deal 225 damage in 300 radius and stun for 10% of Burning Army's duration. | ||
| Drow Ranger | Frost Arrows | Refracting Arrow | Frost Arrows shatter on hit and send arrows at enemies within 400 range of the target. Sends 1 arrow per 1.0 second of Frost Arrows Slow Duration. |
| Bitterly Cold | Whenever Frost Arrows Slow is applied to an enemy, the enemy gains a Bitterly Cold stack, dealing 75% of Frost Arrow's Bonus Damage per Bitterly Cold stack every second. Damage is increased to 150% if the target is moving. Bitterly Cold can build up to 4 stacks and lasts 200% of Frost Arrows Slow Duration. | ||
| Wave of Arrows | Frost Arrows attacks have a 15% chance to send a wave of Multishot in the direction of attack. | ||
| Gust | Silent Echo | A second Gust echos with 100% increased size and knockback after a 1.5 second delay. | |
| Fleet-Footed | Allies hit by Gust slip from the enemy's grasp with 40% increased movespeed and phased movement for the same duration as Gust's Silence and Blind Duration. Drow gains free pathing when hit. | ||
| Armed and Ready | Enemies hit by Gust reduce the cooldown of Multishot by 1 second. Enemies hit by Multishot reduce the cooldown of Gust by 1 second. | ||
| Crosswind | Gust becomes vector targetted, applies Frost Arrows Slow and deals 600% of Frost Arrows Bonus Damage as magical damage. | ||
| Multishot | Shifting Shots | Drow can move during Multishot. Multishot will continue to be centered on the initial target location. Drow has 10% reduced movespeed while flanking. | |
| Wall of Arrows | Multishot fires an additional 4 arrows per second along each side of Multishot's arc. | ||
| Overwhelming Power | Multishot hits generate stacks of Overwhelming Power, giving Drow knockback on her attacks, 20% bonus damage, and 5% bonus move speed. Overwhelming Power stacks fall off at a rate of one per second. | ||
| Marksmanship | Marked Reflexes | Drow sends a wave of Gust in the direction of the next enemy that disabled her Marksmanship aura if it has not been disabled for 5 seconds. | |
| Glacial Blast | Marksmanship's active gains 2 charges and shots create an explosion of frost, damaging and rooting all enemies near the target. The area affected has 33% of the radius of Marksmanship's aura, deals Marksmanships's bonus damage as magic damage, and applies a 0.8s root. | ||
| Gyrocopter | Rocket Barrage | Rocket Attack | Autoattacks have a 20% chance to create a Rocket Barrage turret at the enemy location that lasts for 3 secconds. |
| Barrage Turret | Rocket Barrage becomes a ground and unit targeted ability that summons a Turrent on an ally or a location that does a Rocket Barrage around it. | ||
| Missle Barrage | Rocket Barrage is attached to the Homing Missile for the full duration of its flight. | ||
| Homing Missile | Missile Ride | Any ally can saddle up and ride the Homing Missile. Enemies hit as the missile passes through them take the Missile's damage. Can not go over impassable terrain. | |
| MiniMissiles | On hitting its target, the Homing Missile splinters into up to 6 minimissiles aimed at other targets within 800 range. The minimissiles deal 50% of the original Homing Missile damage and stun. | ||
| Missile Strike | On hitting it's target, the Homing Missile creates a Call Down at it's location, with 25% of it's radius and power. | ||
| Flak Cannon | First Strike | The first strike of Flak Cannon hits all visible enemy units on the map. | |
| Cannon Missile | The first attack of Flak Cannon launches Homing Missiles at all secondary enemies hit, that deal 50% of Homing Missile damage and stun. | ||
| Napalm Trail | All secondary shots from Flak Cannon leave a trail of fire beneath them that deal 20% of Gyrocopter's attack damage every 0.5 seconds. | ||
| Call Down | Cluster Bomb | Call Down leaves a mine field in it's wake that lasts 90 seconds. Each mine deals 25% of Call Down damage. | |
| Strafe | Call down summons 3 wingmen that fly over the battle field, hitting all units in range with Rocket Barrage. | ||
| Precision Strike | Instead of one Call Down, Gyrocopter creates a 175 radius Call Down around each target in the initial area of effect. These strikes follow their targets and do not miss. | ||
| Juggernaut | Blade Fury | Fury Sparks | Blade Fury deals increased damage to enemies the farther they are from Juggernaut. For every 200 range from Juggernaut, Blade Fury deals 100% increased damage. |
| Fury Force | Blade Fury creates a duplicate at the cast location that gently pulls enemies in and deals 50% damage. | ||
| Flourishing Sweep | Blade Dance critical hits send a flying Blade Fury that travels 800 units at 250 speed. Only one flying Blade Fury can exist at a time. | ||
| Healing Ward | Swords on a Ward | Healing ward casts Blade Fury at the start. | |
| Detonate Ward | After healing, Healing Ward automatically chases an enemy and detonates with damage equal to 50% of the total amount healed. | ||
| Zen Ward | Juggernaut gains the ability to summon a Zen Ward which regenerates mana at the same rate Healing Ward regenerates health and gives an armor buff equal to twice Healing Ward's health percentage. | ||
| Blade Dance | Up-Tempo | Blade Dance critical hits reduce the cooldown of the ability with the longest remaining cooldown by 1.5 seconds. | |
| Double Time | Blade Dance gains 2 charges of a short range teleport. The next 2 attacks after teleporting are rapid and long range. The teleport and bonus attacks have a range of 450. Recharges every 15s. | ||
| Flashing Steel | Blade Dance critical hits give Juggernaut a multiplicatively stacking 15% movespeed and 15% evasion buff that lasts 7 seconds. Max of 5 stacks. Unlocks max movement speed for Juggernaut while active. | ||
| Omnislash | Omnislash Duet | Omnislash can be cast on an ally and they will also cast Omnislash. | |
| Dizzyslash | Juggernaut casts Blade Fury for the full duration of Omnislash. In addition, Juggernaut casts a free Blade Fury at the end of Omnislash. | ||
| White-Hot Katana | Juggernaut overheats his blade during Omnislash, mini stunning and igniting all enemies hit for 25% of his attack damage each second over 5 seconds and slowing them by 40%. When the Omnislash ends Juggernaut is invulnerable, phased, and disarmed for 2.5 seconds as the blade cools. | ||
| Luna | Lucent Beam | Diffusion | Lucent Beam strikes gain a 250 area of effect, causing 30% of the effect on nearby units. |
| Lunatic Frenzy | Lucent Beam can target a friendly unit, granting it 20% lifesteal and attack speed by 30% of Lucent Beam's damage and causing temporary night. The duration is equal to 3x Lucent Beam's stun duration. | ||
| Crescent Moon | Allows Lucent Beam to be ground targeted. Lucent Beams release an instant attack on enemies in Moon Glaive's range of the initial target. | ||
| Moon Glaives | When The Moon Hits Your Eye | Glaives gains an active ability that causes the next attack's glaives to knockback enemies, stunning them for 0.75s and slowing them for 5s. This effect can passively trigger on any glaive hit 12% of the time. Cooldown: 12. | |
| Sharp Satellites | Luna passively gains a rotating shield of glaives that impact and deal an instant attack to enemies it collides with. Glaives are replaced every 10 seconds until the max, which is equal to the current Glaive Bounce count. | ||
| Moon Well | When a unit dies from a glaive bounce, a 250 radius eclipse with 35% of the primary beam count and night duration is created at the unit's location. | ||
| Lunar Blessing | Lunar Remnant | When a Luna attacks an enemy, that enemy receives a stacking debuff that causes it to take Lunar Blessing's damage per second for 3 seconds. | |
| Over the Moon | Lunar Blessing's cooldown is reduced by 50% and casting is instant, causing luna to leap forward 750 range, strinking targets under her with Lucent Beams with a percentage of power equal to 3x Lunar Blessing's damage bonus. | ||
| Mark of the Moon | Luna's primary attack applies a Mark for 6s which applies -10 Magic Resistance. When Luna casts Lucent Beam, all Marked units are also struck by beams. | ||
| Eclipse | Lunar Cycle | Killing enemy units while Eclipse is active reduces Eclipse's current cooldown by 10 seconds each time. | |
| Lunar Focus | Gives Eclipse 3 more beams. Changes Eclipse so it can either be cast on an allied unit or on a point on the ground. If point cast, the radius decreases to 300 and the beams fire 200% as quickly. | ||
| Into the Night | During the night, friendly units gain bonus movement speed and evasion equal to 3x the Eclipse beam count, with Luna gaining double the benefit. Eclipse night lasts an additional 4 seconds. | ||
| Slark | Dark Pact | Broken Contract | Dark Pact adds Essence Shift stacks for each target hit. |
| Smells Fishy | Dark Pact Push pushes away enemies with each pulse, stunning them for 1.5 seconds. | ||
| Brackish Bath | Dark Pact can target units, friendly or enemy, and purges all allies around the target. Dark pact deals 150% more damage. | ||
| Pounce | Gone Fishing | Slark also attacks all targets he jumps through, including the leashed enemy. | |
| Little Skippers | Creates 6 copies of Slark that jump in different directions in a 180 degree cone, damaging and leashing enemy units. | ||
| Fish Food | Allies attacking a leashed unit get a bonus 60 attack speed. | ||
| Essence Shift | Apex Predator | When Essence Shift is activated, Slark attacks everyone in a 250 radius. | |
| Lucky Catch | With each attack, Slark has a 15% chance to apply Pounce on the attacked target. | ||
| Sea School | When activated, increases the primary stat of all allies by the same amount Slark increases his agility. | ||
| Shadow Dance | Deep Six | When Shadow Dance is activated, Slark also activates his Essence Shift active, with 2x the amount of Essence Shift's max stacks. | |
| Reef Rage | While in Shadow Dance, every 0.25 seconds, Slark emits a Dark Pact pulse. | ||
| Hook, Line, and Sinker | When Shadow Dance is activated, pulls all enemies in a 450 area of effect towards slark and leashes them with the current level of Pounce. | ||
| Sniper | Shrapnel | Explosive Shrapnel | Units that die under Shrapnel explode in a 325 unit radius, stunning enemies for 1s and dealing 50% of the Shrapnel damage they received. |
| HO HO, HA HA! | Sniper gains 10 attack speed for 15s for each enemy that dies under Shrapnel. | ||
| Bullet Dance | Enemies gain miss chance and Sniper gains movespeed equal to Shrapnel's Slow while under Shrapnel. | ||
| Headshot | Full Bore | Headshots apply a stacking 2 armor reduction that lasts 7 seconds. | |
| Gutshot | Headshot gains an active component, allowing it to fire Sniper's attack with a guaranteed headshot in a cone in front of him. The knockback and slow are increased by 10x. Cooldown: 10, Mana Cost: 50. | ||
| Say Goodbye To Yer Head! | On an attack, Sniper has a 50% of Headshot's base chance to fire a minor Asssassinate at the target with 25% power. | ||
| Take Aim | Run & Gun | Take Aim applies a weak purge to Sniper and changes the slow value by 100, causing Sniper to sprint instead of move slowly. | |
| Shooting Gallery | While Take Aim is active, each attack fired grants an additional stacking 50 attack speed for the duration. | ||
| Artillery | While Take Aim is active, its bonus attack range is increased by 2x, and his attacks create instant 50% strength Shrapnel at the target's location that stacks with other sources of Shrapnel. | ||
| Assassinate | Buckshot | Assassinate hits enemies in a cone behind the main target for 75% of Assassinate's damage. | |
| Hipfire | Reduces Assassinate's aim duration by 50% and applies a 1.5s stun to the target. | ||
| Concussive Grenade | Sniper gains Concussive Grenade, a new ability that launches a concussive grenade at the target location, knocking back Sniper and enemies. Enemies take damage equal to 100 + 50% of Assassinate's damage. | ||
| Templar Assassin | Refraction | Glass Shield | Refraction can be cast on allies. Cast range is 800. |
| Absorption | Every time an enemy is killed with Refraction Damage active, gain 1 stack of Refraction Damage Absorb. | ||
| Smoke and Mirrors | When Refraction is activated, a Psionic Trap is placed where Templar Assassin is standing. | ||
| Meld | Vanishing Slice | Templar Assassin attacks all enemies in a 300 area of effect when activating Meld. | |
| Celestial Step | Meld becomes a ground targeted skill with a cast range of 600. Templar Assassin instantly teleports to the selected location and goes into Meld. | ||
| Latent Charge | Every time an enemy is killed while debuffed by Meld Strike, Templar Assassin gains a charge of Refraction Damage. | ||
| Psi Blades | Covert Devices | Templar Assassin has a 15% chance to create a Psionic Trap under a target hit by the Psi Blades spill. | |
| Psychic Burst | Psi Blades deal damage in a 175 Area of Effect around the spill target. | ||
| Psionic Trap | Veiled Cuts | Psionic Traps also launch a Meld attack onto each enemy when they detonate. | |
| Resurgence | Psionic Traps heal all Templar Assassin's allies for 50% of the damage they deal. | ||
| Shaded Echo | Psionic Traps stay on the ground and pulse, dealing additional damage, up to 3 times. | ||
| Ursa | Lua error in Module:Ability_ID at line 61: Could not find Cargo data for "Earthshock". | Cannonball | Earthshock applies 125 knockback and stuns for 1.5 seconds. |
| Digging In | Earthshock applies and has its damage increased by Fury Swipes. | ||
| Relentless | Earthshock slows for an additional 2 seconds. Enemies that die under the Earthshock debuff give Ursa 3 stack(s) of Overpower. | ||
| Lua error in Module:Ability_ID at line 61: Could not find Cargo data for "Overpower". | Torn to Shreds | Overpower attacks do 130% critical hits. | |
| Elusive | Overpower provides 30% evasion for 3.5 seconds. | ||
| Reckless | Overpower attacks deal 35% of attack damage as physical dmage in a cone up to 650 distance behind the target. | ||
| Lua error in Module:Ability_ID at line 61: Could not find Cargo data for "Fury Swipes". | Lacerated Armor | Fury Swipes apply 1 armor reduction per stack. | |
| Rend | Fury Swipes give Ursa 3% Lifesteal / Spell Lifesteal per stack. | ||
| Ursa Minor | Fury Swipes gains an active component that summons 3 invulnerable, uncontrollable Ursa Cubs. The cubs deal, will randomly attack, and apply Fury Swipes for Ursa and themselves on nearby enemies, but the cubs receive only 25% of the Fury Swipes bonus damage. Duration: 10, Cooldown: 20, Mana Cost: 50. | ||
| Lua error in Module:Ability_ID at line 61: Could not find Cargo data for "Enrage". | Rampage | An Earthshock is triggered at Ursa's position every 1 second(s) while Enrage is active | |
| Ferocity | Enrage provides 80 attack speed to allies within 700 radius. | ||
| Protect the Cubs | Enrage also provides all Enrage benefits to allied Heroes within 700 radius. | ||
| Viper | Poison Attack | Contagion | When a unit dies affected by Poison Attack, the current debuff is applied to enemies in 300 area of effect. |
| Venomous Discharge | Poison Attack festers and explodes when expiring, dealing damage in a 300 area of effect equal to 2x the total damage the enemy took from the current debuff. | ||
| Poison Snap | Whenever an enemy takes 25 damage from Poison Attack, it will be mini-stunned. | ||
| Nethertoxin | Toxic Osmosis | Nethertoxin restores 8% of its damage dealt as health to Viper. | |
| Nethertoxin Charges | Nethertoxin gains 2 charges. | ||
| Lingering Miasma | Enemies that die from Nethertoxin extend the pool duration by 2 second(s). | ||
| Corrosive Skin | Exudate | Viper gains 25% of the attack speed lost by targets debuffed by Corrosive Skin as bonus attack and movement speed. | |
| Fly Into a Rage | Corrosive Skin can be activated to gain flying movement for 8 seconds, and automatically apply Corrosive Skin's debuff to all enemies within 450 range. The poison damage is doubled. 30 cooldown, 50 mana cost. | ||
| Shedding Skin | Corrosive Skin becomes an aura that affects teammates within 900 range for half the effect. | ||
| Viper Strike | Antitoxin | Viper Strike can target allies, healing them for the damage amount and buffing their movement and attack for the slow amounts. | |
| Contamination | Viper Strike becomes a no target spell. Any target walking within Viper Strike cast range for the duration of the ability will be struck by a Viper Strike every 0.4 seconds. The duration of the ability is equal to Viper Strike's overall debuff duration. | ||
| Snakebite | Viper Strike will bounce to 2 additional targets. | ||
| Weaver | The Swarm | Bug Your Friends | Beetles attach to allies, healing them and increasing their armor for the values of the base ability. |
| Bug Bug Boom | When a Beetle is killed, it explodes in a 250 radius, dealing damage equal to 150% of the damage it already dealt to its target. | ||
| Hivemind | All enemies affected by the Swarm transfer 30% of damage dealth to other affected units within 450 range. | ||
| Shukuchi | Reality Rips | Shukuchi leaves a trail behind Weaver that lasts 4 seconds and deals 35% of Shukuchi's damage every 0.5 seconds. Path radius is 150. | |
| Blacklist | Once Shukuchi is complete, Weaver fires an attack at all affected enemies. | ||
| Shukuchi Swarm | Units hit by Shukuchi are automatically affected by the current level of the The Swarm. | ||
| Geminate Attack | Many Threads | Weaver's additional attack hits an additional 3 targets in Weaver's attack range + 250. | |
| Swarm the Beaches | Weaver's additional attack attaches the current level of The Swarm to the target. | ||
| Give Some, Take Some | Weaver's additional attack lifesteals 20% of the attack, and knocks back the target by 40 range. | ||
| Time Lapse | Back To Basics | Time Lapse can target allies. | |
| All's Well that Starts Well | When Time Lapse is cast, it automatically restores the target to full health and mana. | ||
| Explosive Reality | Time Lapsed units create explosions at the start and end of their paths, damaging units in a 250 area for 50% of the target's missing Health. | ||
| Bane | Enfeeble | Shared Torment | Bane's attacks and targeted abilities on an Enfeebled unit will spill in a 700 range and 200 width behind it. |
| Dark Tendrils | For every 2 seconds that an enemy is Enfeebled or when it dies, a stationary Fiend's Grip is created behind it for Enfeeble's max duration. If a unit walks into the area, it will reciece a short Fiend's Grip lasting 50% of the normal duration. | ||
| Dark Symbiosis | Enfeeble may be cast on allies, lasting 2x the duration and grantim them bonuses instead of debuffs. | ||
| Brain Sap | Mind Fracture | Brain Sap knocks the targeted unit back 500 range away from Bane, Brain Sapping and applying a 50% movement slow for 4 seconds to all enemies hit. Secondary targets only heal for 35% of the normal amount. | |
| Cloud of Frailty | Grants 2 charges of Brain Sap. If an enemy with Brain Sap dies within 8 seconds of being Brain Sapped, any of their debuffs applied by Bane are spread to targets in a 500 radius around the dying unit. | ||
| Shaded Apparition | When a unit is Brain Sapped, Bane gains invisibility and 30% movement speed for 4 seconds. His attack to break invisibility will deal a critical strike with bonus damage equal to 100% of Brain Sap's damage. | ||
| Nightmare | Sleep Terror | When Nightmare ends, enemies in a 500 area around the unit are dealt damage equal to the accumulated damage the unit took from Nightmare. | |
| Sweet Dreams | Friendly Nightmared units gain a 200% longer invulnerability period that grants them 750 unslowable movespeed with flying, and any Brain Saps occuring while an ally is Nightmared will Heal it. | ||
| Nyctasha's Congregation | Nightmare confuses instead of stunning enemies, causing them to attack nearby enemies with 60% bonus movement speed and 120 bonus attack speed. The confused enemy becomes disable resistant and cannot go below 1 health until the debuff ends. Nightmare lasts 2x on non-Captain enemies. | ||
| Fiend's Grip | Black Ichor | Every second while Fiend's Grip is channelled, an additional target within 300 range of Bane or a currently affected target becomes Fiend's Gripped for the remaining time of the original debuff. | |
| Driven to Delirium | Fiend's Grip can be cast on allies, granting them bonus attack and movement speed equal to Fiend's Grip's damage per second. Their attacks steal 500% of the mana drain values as health for themselves and Bane. Increases Fiend's Grip cast range by 200. | ||
| Fear the Dark | Bane will automatically Nightmare enemies that attack him while channeling Fiend's Grip. | ||
| Disruptor | Thunder Strike | Cloud Cover | Interval between strikes reduced by 50%. Amount of strikes increased by 3. |
| Mana Storm | Every strike restores 8% of max Mana to allies in a 450 radius around the target. Each strike also increases Disruptor's Intelligence by 2 for 25 seconds. | ||
| Critical Strike | Every strike has a 25% chance to crit, dealing 175% damage. | ||
| Loaded Weapon | Disruptor gains 60% chance to cast a Thunder Strike on an attacked target. | ||
| Glimpse | Blast in the Past | When enemies arrives at their final destination, 170% of Disruptor's Intelligence is dealt in a 250 radius around them. | |
| Shocking Travel | Deals 70% of Disruptor's Intelligence for every 75 units of distance the enemy has been glimpsed, over the course of the glimpse duration. | ||
| Kinetic Field | Electric Fence | Kinetic Field deals 50% of Disruptor's Base Attack Damage to enemies trapped inside every 0.5 seconds. | |
| Area of Bliss | Allies inside the kinetic field heal 50% of Disruptor's Intelligence every 0.5 seconds. | ||
| Stay in the Zone | Kinetic Field increases allied attack speed by 60. | ||
| Ring-ception | Creates a second Kinetic Field with a radius that is 2 times bigger than the original. | ||
| Static Storm | Perfect Storm | Static Storm automatically creates a Kinetic Field on cast. | |
| Field of Dreams | All attacks on the affected enemies have a 30% chance to crit for 150% damage. | ||
| Pacific Storm | All enemies caught in Static Storm deal 30% less damage. | ||
| Lich | Frost Blast | Frozen Solid | Frost Nova's blast encases enemies in ice, rooting and disarming them. |
| Death Dealer's Discount | Increases primary and area damge dealt to the primarey target by 50%. If Frost Nova kills its primary target, 75% of its mana cost is refunded and its cooldown is reduced by 100%. | ||
| Frost Splinters | Physical attacks against enemies slowed by Frost Nova deal 50% of the attack's damage as magic damage to nearby enemies. The damage radius is the same as Frost Blast's. | ||
| Frost Shield | Shiver Shield | Each pulse of Frost Shield applies 5 stacking magic resistance reduction to enemies and mini-stuns them. Stacks up to 6 times. | |
| Frost Giant | Allies affected by Frost Shield grow to giant size, gain 50 movement speed, can path over any terrain, and deal 100% of Lich's Intellect per second to enemies they are standing on. | ||
| Anti-Magic Shield | When Frost Shield is cast on allies it applies a strong dispel and grants them magic immunity for 3 seconds. | ||
| Sinister Gaze | Sinister Spire | Sinister Gaze creates an Ice Spire at the center of its effect and attracts enemies to it, rather than to Lich. The Ice Spire lasts for 18 seconds and reduces the move speed of nearby enemies by 50. | |
| Life Leech | Sinister Gaze deals 150% of the mana restored as damage and heals Lich for the same amount. | ||
| Skeletal Summoning | Lich summons a skeletal warrior next o each enemy effected by Sinister Gaze. The base attack of the skeletons is increased by the same percentage as Sinister Gaze's mana resoration percentage. Skeletons last 10 seconds. | ||
| Chain Frost | Splitting Cold | Each bounce of Chain Frost splits into two bolts if there are at least two possible targets. Half the total of the remaining bounces is transferred into each bolt. | |
| Friendship Chain | Chain Frost can target and bounce to friendly heroes, granting them Frost Shield. Adds 4 extra bounces to Chain Frost. | ||
| Blast Chain | Chain Frost bounces cause Frost Blast bursts around enemies. | ||
| Lina | Dragon Slave | Dragon Trail | Dragon Slave leaves a trail of 4 Light Strike Arrays in it's wake. These Light Strike Arrays have 50% less radius and damage. |
| Trislave | Whenever a Dragon Slave is cast, it creates 2 additional waves of fire to either side of the primary wave. Secondary waves deal 50% less damage. | ||
| Ignition | Enemies hit with Dragon Slave are ignited for 3 seconds, taking 10% of Dragon Slave's damage every 0.5 seconds, and giving Lina 10 mana per unit hit. | ||
| Dragon's Toot | Dragon Slave can be cast on Lina or an ally. This causes a Dragon Slave to be cast behind the targeted unit, propelling them up to 50% of Dragon Slave's in the direction they are facing. Dragon Slaves cast this way deal 150% more damage. Dragon Slave's cast point is reduced to 0.2. | ||
| Light Strike Array | Light Pulsation | Light Strike Array pulsates 3 more times where it was cast. | |
| Firestrike | Every enemy hit by Light Strike array are aslo attacked by Lina. | ||
| Vacuum Array | Enemies within 150% of Light Strike Array's radius get pulled in and hit by LSA. | ||
| Fiery Soul | Multisoul | When Fiery Soul is activated, Lina attacks up to 3 targets with 100 bonus range. Secondary targets take 50% less damage | |
| Share the Burn | Fiery Soul active becomes ally-targeted with 850 cast range, giving the ally both the passave and active bonuses of Fiery Soul for the duration. | ||
| Laguna Blade | Bouncy Blades | Laguna Blades bounces to up to 7 additional targets | |
| Long Blade | Laguna Blade turns into a channeling spell. Every 0.2 seconds, Lina acquires an additional target for her Laguna Blade. On release, she hits all of them at once. Can acquire up to 5 seconds. | ||
| Linear Blade | Laguna Blade hits every unit along it's path of travel, within a 125 width. | ||
| Queen of Pain | Shadow Strike | Stinging Lash | Each attack has a 20% chance to apply Shadow Strike to the target. |
| Spread the Pain | Each attack Shadow Strike bounces to up 5 additional targets. | ||
| Delight and Torment | When the debuff effect of Shadow Strike ends, that unit emits a Scream of Pain | ||
| Blink | Haunting Echos | Blink generates a Scream of Pain at its end position. | |
| Fervent Assault | Blink provides 60 bonus attack speed for 4s. | ||
| Hall of Pain | Enemies that are between the start and end points of Queen of Pain's Blink get hit by her current level of Shadow Strike. | ||
| Scream of Pain | Rapturous Cry | When an enemy is killed by Scream of Pain, Queen of Pain's Blink cooldown is reset. | |
| Invigorating Shriek | Every enemy hit by Scream of Pain sends back an echo to Queen of Pain, healing her for 10% of the damage dealt and restoring 10% of Scream's mana cost. | ||
| Resounding Wail | Knocks back every enemy hit by Scream to the max distance of Scream's area of effect. Every hit reduces the cooldown of Sonic Wave by 0.75s. | ||
| Sonic Wave | Thundering Resonance | Sonic Wave leaves a trail that applies 20% damage of Sonic Wave's damage every 0.5 seconds. The trail lasts 6 seconds. | |
| Sonic Tsunami | When Sonic Wave is cast, it is emited in 6 directions around Queen of Pain. | ||
| Discordant Force | Increases Queen of Pain's Attack Speed and Attack Damage by 10 for 15 seconds for each enemy hit with Sonic Wave. | ||
| Void Spirit | Aether Remnant | Phantom Attack | Enemies caught by Aether Remnant recieve a 200% critical strike attack from Void Spirit. |
| Inverted Force | At the end of Aether Remnant's pull, it pushes affected enemies 550 units away. Other enemies the pushed unit collides with receive 200% of Aether Remnant's damage, have 40% movement slow for 4s, and are knocked back. | ||
| Dissimilate | Translocate | Upon casting Dissimilate, allied heroes within 350 radius of Void Spirit are pulled into the void with him. Each translocated ally deals 75% of Dissimilate's damage where it reappears and receives Resonant Pulse's base shield absorb. | |
| Expanse | Adds a partial outer ring to Dissmilate. Upon exiting a portal, Void Spirit applies Astral Step's void mark to all enemies in the portal's radius. Reduces Dissimilate's cooldown by 2s. | ||
| Triad Echo | Dissimilate generates 3 remnants at the exit portal. Increases Aether Ramnat pull duration by 0.7s. | ||
| Lure of the Void | Void Spirit's exit portal leaves a burning circle that increases spell damage against enemies by 12% and deals 20% of Dissimilate's damage every 0.5s. lasts 7s. | ||
| Resonant Pulse | Null Force | Resonant Pulse applies 200 knockback and deals a Void Spirit attack to all affected enemies. | |
| Cadence | Allies hit by Resonant Pulse gain a shield protecting them against physical damage. The total damage blocked is 2 times Resonant Pulse's shield absorb. | ||
| Suppression | Resonant Pulse gains 2 charges and provides magic immunity for 2s. | ||
| Astral Step | Calculated Attacks | Void Spirit's attacks apply Astral Step's Void Mark with 50% damage potency. | |
| Turbulent Rift | Astral Step leaves a damaging trail, applying 15% of the Void Mark Damage as burn damage every 0.5s for 4s. | ||
| Breach | The first unit hit by Astral Step receives 40% of the Void Mark Damage every 0.5s for 6s. | ||
| Winter Wyvern | Arctic Burn | Winter's Breath | Arctic Burn attacks up to 2 additional targets within range, dealing 50% less damage to secondary targets. |
| Second Degree Burn | Every 3.5 seconds, an Arctic burn attack is doubled. | ||
| Arctic Splash | Arctic Burn attacks damage enemies in a 175 radius around the target. | ||
| Splinter Blast | Chilled to the Bone | After the secondary targets are hit, the main target is struck by returning splinters from each target for 50% of Splinter Blast's damage. | |
| Cool and Collected | Splinter Blast pulls secondary targets towards the initial target and applies the current level of Arctic Burn debuff. | ||
| Soothing Breeze | Splinter Blast heals allies around the target for 50% of the Splinter Blast's damage. | ||
| Cold Embrace | Empowered Embrace | Cold Embrace now has 2 charges. Units that attack an embraced target have Arctic Burn applied to them. | |
| Ice Cold Killing | At the end of Cold Embrace, the current level of Splinter Blast will emanate from the affected unit. | ||
| Diamondize | Cold Embrace targets also gain magic immunity and can move at 225 movement speed. | ||
| Winter's Curse | Sharing is Scaring | Winter's Curse remaining duration transfers to a nearby enemy if the initial target dies. | |
| Foul Cursing | Incoming damage from affected enemies to the target is amplified by 50%. | ||
| Wintermancy | Heals Wyvern and all her allies for 50% of the target's max HP if it dies during Winter's Curse. | ||
| Witch Doctor | Paralyzing Cask | Multi-Cask | Paralyzing Cask launches 1 additional casks to targets in the cast range. |
| Bad Medicine | Paralyzing Cask applies the current level of Maledict on hit. | ||
| A Fine Powder | Paralyzing Casks deal their damage in a 250 radius. | ||
| A Big Mess | Witch Doctor has a 15% chance to throw his current level of Paralyzing Cask when attacking. | ||
| Voodoo Restoration | Hocus-Pocus | Voodoo Restoration affects enemies as well, dealing the heal amount as damage. | |
| Invigorating Charm | Allies affected by Voodoo Restoration also gain 15% lifesteal. | ||
| Cursed Aura | Enemies in Voodoo Restoration's radius take 35% bonus damage from all sources. | ||
| Spirit Balm | All mana used on Voodoo Restoration is granted to all allies in its area, except for Witch Doctor himself. | ||
| Maledict | Blighted | When Maledict ticks, it damages all enemies in a 300 area of effect. | |
| Mumbo Jumbo | Every big tick of Maledict heals Witch Doctor for 65% of the damage dealt. | ||
| Strange Boon | Allies can be affected by Maledict. 60% of damage dealt by the spell heals them instead, along with additional bursts of healing based on how much damage they've taken. | ||
| Infectious Malady | Every time Maledict does a burst, it infects enemies in a 250 radius with the same level of Maledict. | ||
| Death Ward | Bewitched | Death Ward does not need to be channeled. | |
| Pain Diffuser | Death Ward attacks 3 additional enemies. These additional attacks do not bounce. | ||
| Wise Enchantment | While Death Ward is active, Witch Doctor takes 80% less damage. |
Rooms[]
Types & Order[]
- Rooms come in different types, and appear at different depths (order of exploration).
- One of several possible rooms will appear at each depth (see list below). Teams can select which room to enter by channeling on an outpost, which displays the room's name, type, and rewards.
- Most depths give players a choice between two types of rooms.
- Challenge: Team must clear one of three challenges. These rooms can randomly receive a difficulty upgrade, making them an Elite room, which has 1 extra room effect (some of which are specific to elite rooms).
- Combat: Clear all enemies.
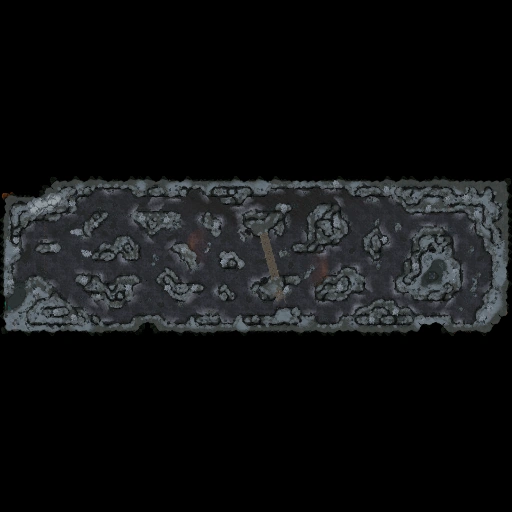
- Trap: Reach the end of an obstacle course.
- Random: Either a Combat or Trap room. The type of room, as well as its room effects, will be revealed after the room has been selected.
- Event: Occurs at random between various challenge rooms, they each contain an NPC that offers potential bonuses and upgrades, sometimes for a cost.
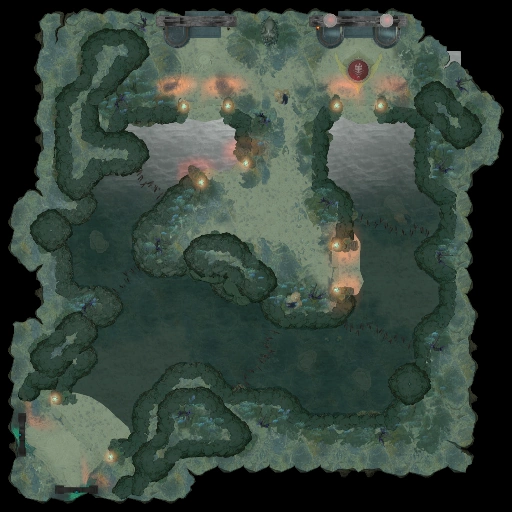
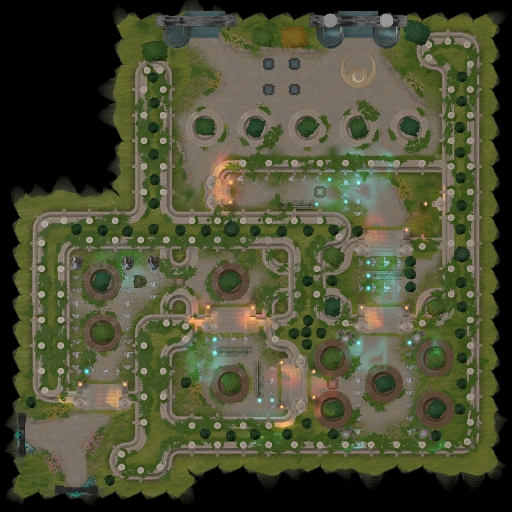
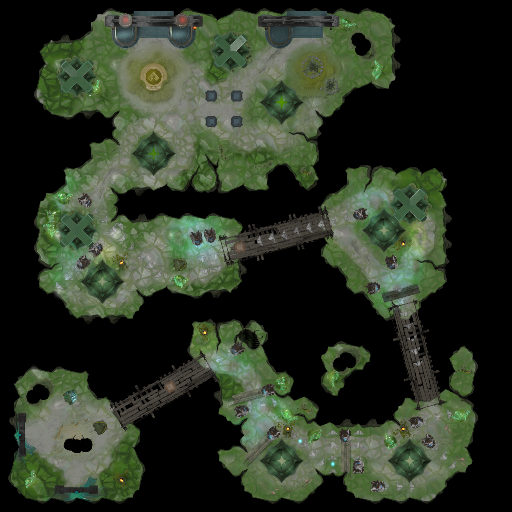
- Boss: Fight against a powerful boss. The boss's statue can be seen at the start of each act, allowing the team to prepare.
- Rest: Rest area before the start of Act 2 & Act 3 as well as before the final boss fight. Will have all three shops.
- Bonus: Mini-game room that rewards team with evenly distributed gold.
- Challenge: Team must clear one of three challenges. These rooms can randomly receive a difficulty upgrade, making them an Elite room, which has 1 extra room effect (some of which are specific to elite rooms).
| Vault | 1-1 | 1-2 | 1-3 | 1-4 | 1-5 | 1-6 | Vault | 2-1 | 2-2 | 2-3 | 2-4 | 2-5 | 2-6 | Vault | 3-1 | 3-2 | 3-3 | 3-4 | 3-5 | |
|---|---|---|---|---|---|---|---|---|---|---|---|---|---|---|---|---|---|---|---|---|
| Start | Combat | Combat | Combat | Combat | Boss | Bonus | Rest | Combat | Combat | Combat | Combat | Boss | Bonus | Rest | Combat | Combat | Combat | Rest | Primal Beast | |
| Elite | Elite | Elite | Elite | Elite | Elite | Elite | Elite | Elite | Elite | Elite | ||||||||||
| Trap | Trap | Trap | Trap | Trap | Trap | Trap | Trap | Trap | Trap |
Room Rewards[]
- After a room is completed, players will be rewarded with a fixed amount of gold, experience point and 3 random Scepter Shards (pick one), except for Rest rooms and Aghanim's room. If a combat room has multiple waves, players will get experience point after each wave.
- Challenge rooms also reward:
- Gold: Varied amount of bonus gold, depending on depth.
- Items: Neutral Items (items' tier depends on depth) or consumable items.
- Life: Two Bonus Lives.
- Elite Challenge rooms have double the rewards, including Elite Scepter Shards, which are twice as potent as regular Scepter Shards.
- Trap rooms have treasure chests at predetermined locations with seemingly random rewards, which is twice as much if they are also an Elite Challenge rooms. Regardless of difficulty, they always give Elite Scepter Shards. Trap rooms additionally give bonus gold for players that complete the trap room (without losing all their lives), completing the trap room without dying and completing the trap room without taking any damage.
- Each player has one of five random Trap Room abilities with a limited number of uses per trap room. Everyone will have different abilities, which are randomly assigned with each trap room encounter.
- Butcher's Hook - Launch a bloody hook toward a unit or location. The hook will snag the first unit it encounters, dragging it in. 1 charge, 1500 range.
- Rattlin' Hookshot - Sends out a hook that latches to the first unit it hits, pulling you to it. Max range: 1500. 1 charge, latches on heroes as well as treasure chests.
- Spirit of Lycan - Grants you bonus movement speed. 75% bonus movespeed, 2 second duration, 3 charges.
- Faerie Fade - Briefly defy all physical dimensions. 2 charges, 1 second duration.
- Hierophant's Shield - Protect your target with invulnerability. 2 charges, 2 second duration, can also be used on allies (cast range of 600).
Challenge Room List[]
- Combat rooms can also be Elite rooms.
- Rooms with asterisk symbols are returning encounters from the original Labyrinth, and cannot be encountered in Apprentice difficulty.
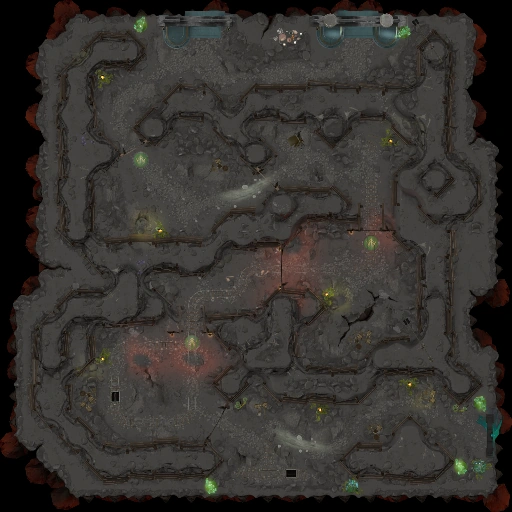
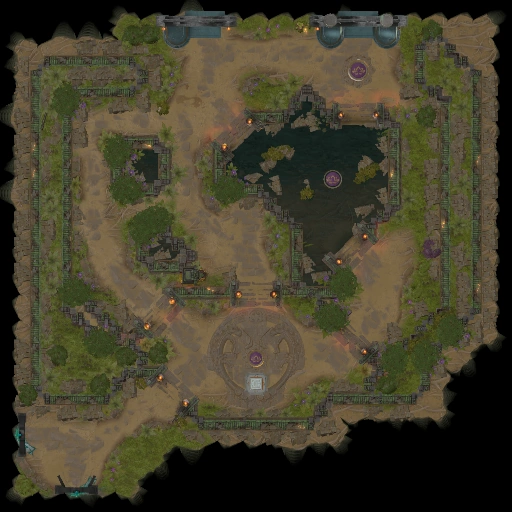
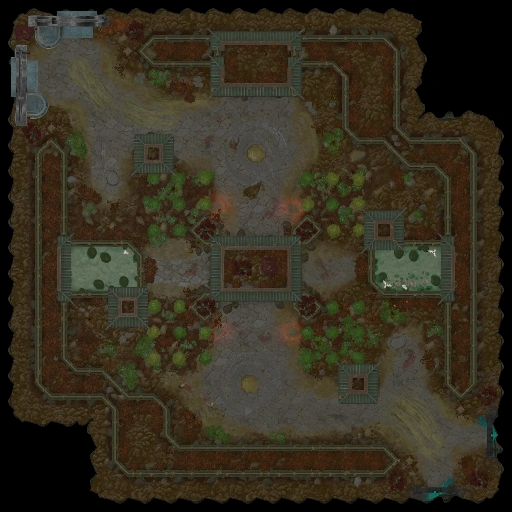
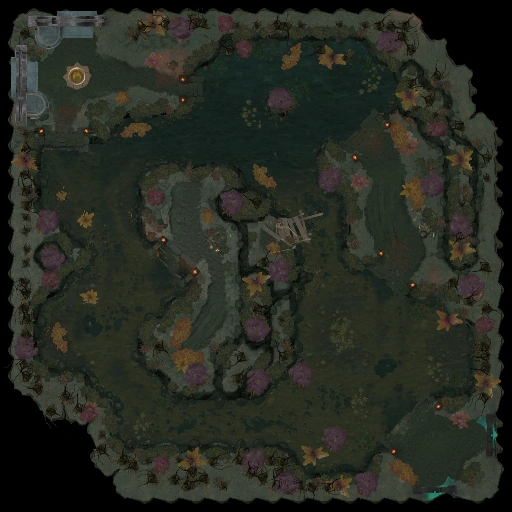
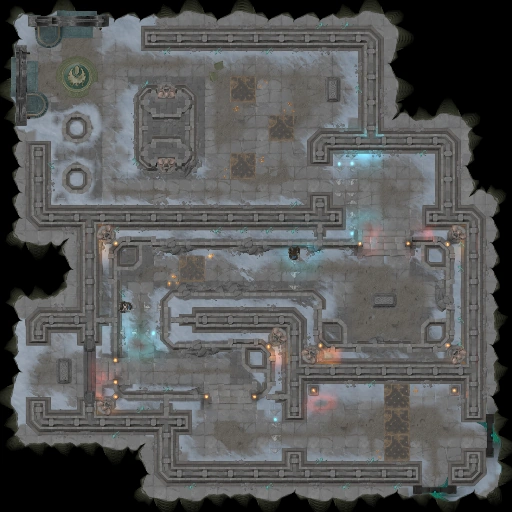
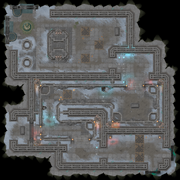
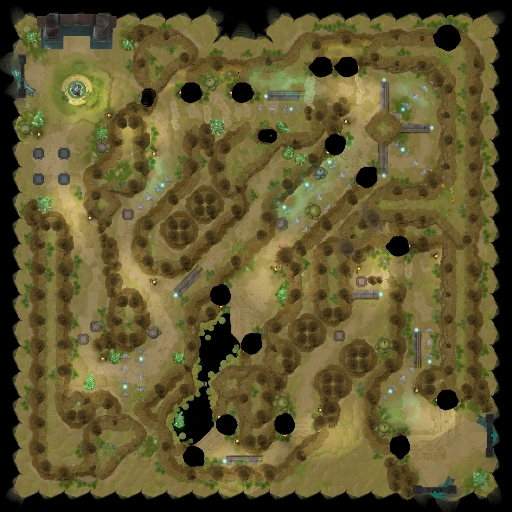
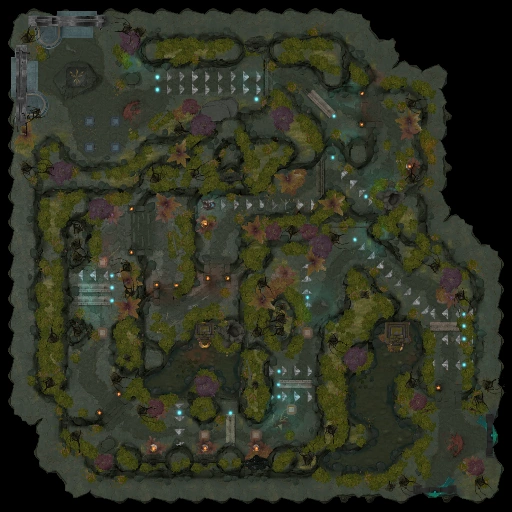
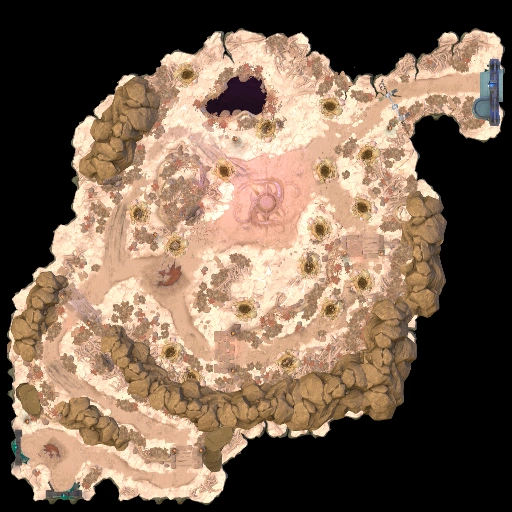
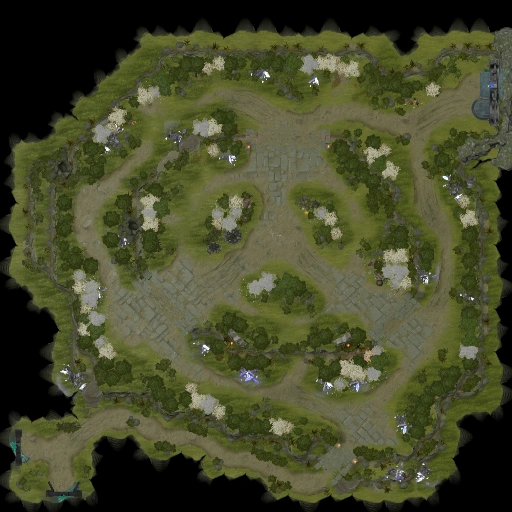
| Depth | Floor | Type | Possible Rooms | Enemies | Notes and Tips | Minimap |
|---|---|---|---|---|---|---|

|
Chippy Conifers Reconvene* |
|
|
  | ||
| 1 | 1-1 |
|
For the Cubs |
|
|
  |
|
|
Splitsville the Second* |
|
|
|||
|
|
Stay Frosty (Easy) |
|
|
  | ||
|
|
The Magma Mines (Easy) |
|
|
  | ||
| 1-2 |
|
Bug Bait |
|
|
  | |
|
|
Dark Forest |
|
|
  | ||
|
|
Jungle Jam* |
|
|
|||
|
|
The Salty Shore |
|
|
  | ||
|
|
The Silent Killer Strikes Again* |
|
|
  | ||

|
Thalassophobia |
|
|
  | ||
|
|
Estate End |
|
|
  | ||
| 1-3 |
|
Gelatinous Bastille |
|
|
  | |
|
|
Mole Cave |
|
|
  | ||
|
|
Morphology Mix* |
|
|
|||
|
|
Multiplicity |
|
|
  | ||
|
|
The Scurry Scarabs of Scuttletown* |
|
|
  | ||
|
|
Bridges to Bedlam |
|
|
  | ||
|
|
Jailbreak |
|
|
  | ||
| 1-4 |
|
Aziyog Caverns (Easy) |
|
|
  | |
|
|
Bamboozled |
|
|
  | ||
|
|
The Melancholy Morass |
|
|
  | ||
|
|
Toothy Toothums Blast Back* |
|
|
  | ||
|
|
Caverns of Catastrophe |
|
|
  | ||
|
|
Crispy Calamity |
|
|
  | ||
| 1-5 | 
|
Ridges of Nishai |
|
|
  | |
|
|
Blooming Cliffs |
|
|
  | ||
|
|
Eldwurm Aerie |
|
|
  | ||
|
|
Rizzrick the Razorsaw's Deep Cuts* |
|
|
  | ||
| 1-6 | 
|
Hook, Line, and Stinker |
|
|
  | |
|
|
Mango Orchard |
|
|
  | ||
|
|
The Frost Robin Flies Again* |
|
|
  | ||
| 2 | 2-1 |
|
A Mind-Tingling Counteroffer* |
|
|
|
|
|
Hard Boiled |
|
|
|||
|
|
Spook Town |
|
|
|||
|
|
The Chain Gang |
|
|
|||
|
|
Tangled Toil |
|
|
|||
|
|
Torched at the Temple |
|
|
|||
| 2-2 |
|
Leave it to Mister Cleaver* |
|
|
||
|
|
The Crystal Forest |
|
|
|||
|
|
Twilight Maze (Easy) |
|
|
|||
|
|
World Beyond the Rim |
|
|
|||
|
|
Burial at Sea |
|
|
|||
|
|
Crumbling Colonnade |
|
|
|||
| 2-3 |
|
My Rock Collection Grows* |
|
|
||
|
|
Red Light Blue Light |
|
|
|||
|
|
Round-Up Canyon |
|
|
|||
|
|
Stonehall Citadel |
|
|
|||
|
|
Mortal Manor |
|
|
|||
|
|
Passage of Penance |
|
|
|||
| 2-4 |
|
Carty's Re-Revenge* |
|
|
||
|
|
Gate of the Dead |
|
|
  | ||
|
|
Nether Reaches (Hard) |
|
|
|||
|
|
Palace of the Beast |
|
|
|||
|
|
Mischief Mines |
|
|
|||
|
|
Tomb of Terror |
|
|
|||
| 2-5 |
|
Keen Commander |
|
|
||
|
|
Nemestice Crater |
|
|
  | ||
|
|
Storegga the Ample Claps Back* |
|
| |||
|
|
Wriggling Wreef |
|
|
|||
| 2-6 |
|
Chaos Carnival |
|
|
||
|
|
It's All Ogre Now |
|
|
  | ||
| 3 | 3-1 |
|
Al, The Chemist Gets Revenge* |
|
|
|
|
|
Arena Assult |
|
|
|||
|
|
Frozen Ravine |
|
|
|||
|
|
Short Cuts |
|
|
|||
| 3-2 |
|
Demonic Woods |
|
|
||
|
|
The Bomb Squad Goes Boom* |
|
|
|||
|
|
The Frigid Pinnacle |
|
|
|||
|
|
Thunder Mountain |
|
|
|||
|
|
Scars Hollow |
|
|
|||
| 3-3 |
|
Battle Squawk Squad |
|
|
||
|
|
Push Pull (Easy) |
|
|
|||
|
|
Smashy & Bashy |
|
|
|||
|
|
The Forsaken Pit |
|
|
|||
|
|
Bush Blades |
|
|
|||
| 3-4 | Vendor Vault | No Enemies |
|
|||
| 3-5 |
|
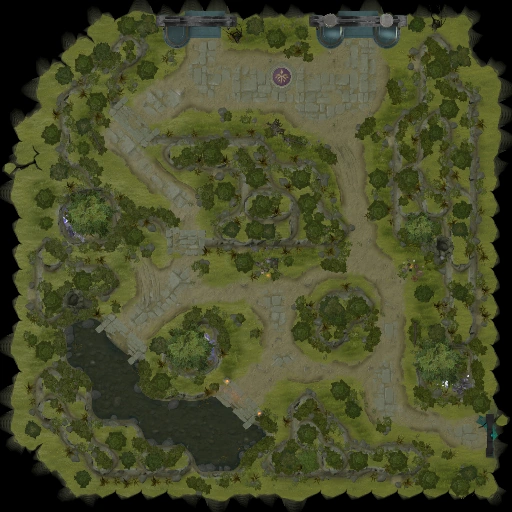
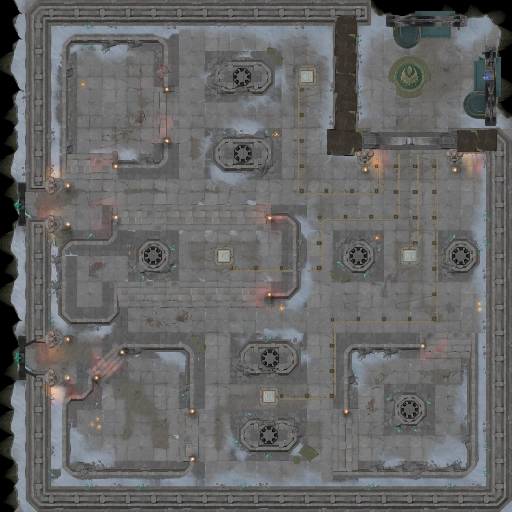
The Beast's Lair |
|
|
Event Room List[]
Event rooms will appear at random throughout your way through the labyrinth, serving as a rest area before the next encounter. Unlike challenge encounters, you cannot choose what you will encounter. It does not replace any challenge rooms, so you will have to clear the same number of rooms regardless of whether one appears or not.
Each contains an NPC hero that offers various wares or upgrades. They sometimes cost gold, result in downgrades or may very well be completely free. They can appear between most rooms, but some rooms only seem to appear in certain acts (parts of the game).
| Room Name | NPC Name & Type | Acts It Appears In | Choices | Flavor Text | Notes and Tips |
|---|---|---|---|---|---|
| Panda Potion Pub | Strange Brewmeister
(Brewmaster) |
Act 1 | 3 of the following consumables (either for free or for 150 gold)
|
Can I offer you a growler? I can tell when someone needs a drink - and my brews are favored by gods and beast alike. Aged in the finest ironwood barrels, you'll find nothing better. I could charge whever I like in these parts, but I'll even give you a bargain price. |
|
| Divine Sanctuary | Thunderlord
(Zeus) |
Act 1 |
|
You there, puny creature. Settle a bet I have with myself. If an insignificant worm somehow won the favor of a god - as does happen from time to time - would that worm desire divine power or divine protection? Choose carefully now. We're not talking hypotheticals. This lowly worm's fate may depend upon your choice. |
|
| Retrofit Outfit | Clinker
(Tinker) |
Act 1 |
|
Look, some shops'll talk your ear off all day trying to make a sale. But I know what I got. And if you want it, great. If not, I've got other places to be. You think you're the only group of adventurers doomed to be lost forever inside the Continuum Vault? Yeah, you wish. I'll have customers until the end of time. Which barely exists here anyway. So, we doing business or what? Oh, and I don't accept useless money. I take my due in trade. |
|
| Arcane Archives | Grimoire Enthusiast
(Warlock) |
Act 1 |
|
Could I interest you in a self-translating grimoire? It's a tome of my own design. I, of course, stand by my work. Even the illiterate can take part in this marvelous discovery. It could truly change the world. If not for the cruelest of ironies. I made my discovery last night before I was drawn into the Continuum Vault. If I don't escape, the world will never know my brilliance or get to learn so many other things the books can reach them. I found someone who knows a way out. Soon enough I'll have enough gold to bribe my way free of this wretched place. |
|
| Gambler's Grove | Glarf Stonebreak
(Ogre Magi) |
Acts 1 or 2 |
|
HAHA HA HA! You're gonne lose! No they're not - they're gonna win! I say lose! No, win! Lose! *Klonk* Stop hitting me! *Klonk* Ow! *Klonk* OK! Win! Just let them play the dumb game. Win! Shut it. |
|
| Murkpools | Greedy Grubbler
(Slark) |
Acts 1 or 2 |
|
Psst. You lookin' to win? I got a secret if you got the scales for it. All's ya need is a little finesse. It's a little secret I picked up in Stonefish Gate, before that maniac Siltbreaker destroyed it, anyway... But I got out alive. And you can too. Trust me. Play it right n' you'll come out ahead in the end for sure. Just don't get nicked. |
|
| Weald of Torment | Ash the Defiler
(Leshrac) |
Act 1 or 2 |
|
I would make you choose, mortal. With the knowledge that thousands of your kind have appeared before me, brief flickers of warmth in the comforting abyss, quickly dissipating into a state of nothingness functionally no different from the professsed state of order in which they came within my sight. For nothing they could accomplish would weigh worthy in the eyes of one such as me. So choose that which you take from here, knowing that I care not what you choose, and that you go forth towards either victory or defeat, but most certainly continuing upon an unrelenting march towards death. |
|
| Pebble's Pit | Pebble Tossington
(Small Tiny) |
Act 2 |
|
Look how big and slow you are. You wanna do something about that? I know how to get you rolling like a stone cold pro. You'll want to shed some of that weight. That's the cost of true speed. But trust me, it's worth it. |
|
| Boggle's Quarry | Cobble Tossington
(Grown Tiny) |
Act 2 |
|
I have so many gifts, but no one wants them. Everyone wants to go fast. I say sometimes slow is better. What about you? Would you like some magic rocks? It sure would carve a smile on my face. |
|
| Stream of Sirens | Sodden Soprano
(Naga Siren) |
Acts 1, 2 or 3 |
|
[[singing]] What an unexpected interlude! By my scale, you make an unlikely quartet. Is this adventuring business really your forte? I hope you're sharp enough. The key is to find your natural hrmony. I can pitch in with a lovely refrain. [[singing]] |
|
| Lucifer's Lounge | Condemnation Connoisseur
(Doom) |
Acts 2 & 3 |
|
I have an eye for desperation and you look like someone in just the right sort of need. Care to make the bargain of your lifetime? Fate-changing gold for just a measure of your precious essence. You don't need it all, and your inventory could certainly use a boost. For one of your esteem, I could go as high as, say... 666 gold? |
|
| Altar of Pestilence | Kosh'Vor Plaguebearer
(Necrophos) |
Act 3 |
|
There is power in the flesh, child. The power of life. Of death. Breathe deep. You can smell the power. Make your own offering and it could restore your life. Or perhaps you would study the offerings of another? Sift deeply, and clean from them what you may. I make no judgements. I merely show the way. |
|
| Shifty Shoal | Lord of Liquid
(Morphling) |
Act 3 |
|
The faces of even the mightiest cliffs will one day erode and tumble into the seas over which they have lorded - in their view - for so long. But to ask the waves, you would find barely a perception of the shoreline's existence - for something so unmoving will always break when left to the ravages of time. Only that which forms and flows to fit the universe around it will endure to explore the black expanse that awaits the ageless. And you? Would you count yourself amongst them? |
|
| Chemical Laboratory | Calbert Veinstein
(Alchemist) |
Act 3 |
|
Do you know how many geniuses die poor? Most! That I've seen. I make my own money and I make things I sell to make even more! You can't have enough, I say. When I die, I'm going to have it all! The coffers of the people and suck- err, patrons like you will all make their way into my purse. There'll b e nothing left! You'll be resigned to carving numbers on rocks to trade amongst yourselves as my death rattle echoes throughout the inaccessible hallways of my treasure vault. Anyway, what'll ya have? I got some nice stuff. |
|
Items[]

Hidden items[]
Some items availiable in this mode are not displayed in the Shop. These items are:
| Icon | Name | Description |
|---|---|---|
| Falcon Blade | +200 Health
+1.8 Mana Regeneration +12 Attack Damage | |
| Witch Blade | +35 Attack Speed +14 Intelligence +6 Armor +300 Projectile Speed
Witch Blade - Causes your next attack to apply a poison for 4 seconds, slowing by 25% and dealing 0.75x your intelligence as damage every second. This attack has True Strike. Cooldown: 9 | |
| Vault Bloodstone | +425 Health +425 Mana
+16 Intelligence +100% Mana Regen Amplification +8% Spell Damage +15% Spell Lifesteal (Hero) +3% Spell Lifesteal (Creep) +30% Spell Lifesteal Amplification Mana battery - Each charge provides 0.2 MP regen and 0.35% Spell Amp. Nearby boss and captain kills provide 1 charges. Dying causes you to lose 3 charges. Starts with 14 charges. Can gain a maximum of 2 charges per combat encounter. Active: Bloodpact - Converts 30% of your max mana to health regeneration over 2 seconds. Cooldown: 85 | |
| Wind Waker | +50 Movement Speed +6 Mana Regeneration +35 Intelligence
Active: Cyclone - Sweeps a target unit up into a cyclone, making them invulnerable for 2.5 seconds. Cyclone can be cast on yourself, enemy units or allied units. |
Consumables[]
| Icon | Name | Description | Shop |
|---|---|---|---|
| Gold Bag | Grants gold based on the round | ||
| Shadow Wave Reflex | When attacked, you have a 5% chance to send out a bolt of power that arcs between allies, healing them while damaging any units standing nearby. You are always healed by Shadow Wave.
|
||
| Torrent Reflex | When attacked, you have a chance to cast a Torrent. |
Neutral items[]
- [special neutral items can be...]
| Icon | Name | Description |
|---|---|---|
| Oblivion's Locket | Passive: +5 All stats Active: Spook (Channeled) - Become ethereal, |
Immortal Authority[]
This poor creature's eyes speak of aeons of suffering.
Would you per chance lay off violence for a moment and consider that this beast - despite its reputation, has never once struck the first blow in an endless existence of torturous fights?
Would you then perhaps allow that a beast of intelligence, of learning, might deign to part with that which it possesses without struggle, instead preferring the civilized course of barter and trade? Whatever your answer, we'll brook no brutality here.
Roshan will appear as a shop just before the first and second bosses, the Continuum Vaults at the starts of Act 2 & 3 and just before the Primal Beast fight. The following are available for purchase, and stocks are refilled for each Roshan encounter:
- A single bite of immortality
- Purchase Life Rune - 1000 Gold (4 in stock)
- One quarter of a wheel of the fabled Roquefort of Life
- One used life
- Purchase Phoenix Ash - 750 Gold (1 in stock)
Misfortune Teller[]
Each cut, every piercing arrow, and all the bloodstained gold they bring you are in themselves only choices that lead to even more choices. Each with consequences unknowable to the likes of you. But I can banish a tiny margin of the fog that beseiges you.
For a small price, I can unveil a few certain steps along an otherwise blind path. After those revelations, however, the rest will again be uncertain. What would you choose?
The Oracle appears in the Continuum Vaults at the starts of Act 2 & 3 and just before the Primal Beast fight. Two random Common Shards can be purchased for 400 Gold, and one random Elite Shard is also available for 800 Gold. Only one shard can be purchased per Oracle encounter.
Ascension levels[]
- Five difficulty levels are available. The preceding difficulty level must be beaten first before the next one is playable.
- For difficulty levels higher than Apprentice, Room Effects applies to each room explored, which are buffs for enemies.
- Beating a level will reward players with two lines for the Chat Wheel, and an Emoticons.
| Level | Difficulty | Reward | Notes | |
|---|---|---|---|---|

|
Apprentice | - | ||
| ||||

|
Magician | Starts with 1 fewer life. Enemies are stronger. |
| |

|
Sorcerer | Gain 10% less gold. Enemies are even stronger. |
| |

|
Grand Magus | Your inventory is cursed. Enemies are extremely strong. |
| |

|
Apex Mage | Bosses have Ascension Modifiers. Enemies are impossibly strong. |
| |
Room Effects[]
- Random effects from this list are added at higher difficulties to make the Labyrinth more challenging.
- Captains refer to larger monsters.
| Room Effect | Description |
|---|---|
| Pyromaniac (Elite only) | Enemy Captains produce fire trails |
| Quiet, please! | Enemy Captains occasionally silence nearby players |
| Living In A Bubble | When in the bubble, enemy Captains gain evasion from attacks from outside |
| Galvanic Farewell (Elite only) | Enemy Captains cast plasma field on death |
| Stone Faced | Enemy Captains take reduced damage from the front (Break disables this) |
| Explosive Personality (Elite only) | Players occasionally explode to damage allies |
| Magical Fortitude | All enemies have increased magic resistance (40%) |
| Thick Skinned | All enemies have increased amor |
| Lucky Strike (unused) | All enemies have a critical strike |
| Deadly | All enemies deal increased damage (+35% outgoing dmg) |
| Last Stand | All enemies gain increased attack speed at low health for a short time (200AS) |
| Surge | All enemies have increased movement speed (40% MS increase) |
| Chilling Touch | All enemy attacks slow their targets. Multiple debuffs stack. |
| Avatar | Enemy Captains occasionally gain magic immunity |
| Death Curse | All enemies debuff the armor of their killers |
| Vampiric | Enemy Captains gain lifesteal from all damage at low health for a short time |
| Degen Field (Elite only) | Enemy Captains reduce healing of nearby players by 100%. |
| Flicker | Enemy Captains teleport randomly and purge debuffs from themselves. |
| Drunk | Enemy Captains occasionally gain bonus move speed, evasion, and critical strike. |
| Glutton | All enemies debuff the turn rate and attack speed of their killers. (can be dispelled) |
| Glimmer | Enemy Captains occasionally gain persistent invisibility. |
| Clumsy | Enemy Captains root their killers upon death. |
| Impatient (unused) | Enemies gradually gain size, damage, and health. |
| Meteoric (Elite only) | Enemy Captains sometimes become meteors and launch themselves at Heroes. |
Rewards[]
- Players earn
 Arcane Fragments after every game. The first 1,800 Fragments earned each week are quadrupled in value, resulting in a total of 7,200 Fragments.
 - Players who own the Battle Pass can earn up to 2,000 Battle Points per week.
- Players who have rescued all 10 Aghanim variants will be able to claim Aghanim the Wisest courier.
Blessings[]
- Blessings are permanent buffs that can be purchased in the Battle Pass with Arcane Fragments. Some blessings can appear more than once (fully stacking with each other), and for varying prices.
| Effect | Number of Occurrences | Cost(s) | Aghanim's Comments/Description |
|---|---|---|---|
| Bottle Charges +1 | 1 | 100 |
Don't argue. Just take this extra bottle charge. Why? Because it's good to have bottle charges. I need you to have bottle charges. Just trust me on this, OK? - Aghanim |
| A Veteran Returns | 15 | 2000 |
(Hero) is back to help explore the Continuum Vault. |
| +1s Bottle Duration | 2 | 300/3000 |
Wait a second. What's that enchanting aroma? Someone's bottle is filled with something other than runes! Can't slip one by me. Whose is it? Spill it. Spill it right into Aghanim's mouth. I am really on edge right now. - Aghanim |
| Death Detonation +75 | 2 | 300/3000 |
When someone kills you, you can't just lie there and take it. You have to do something. Specifically, you have to deal 75 damage multiplied by your level to enemies within a 350 AoE. That'll show those buffoons not to do that again. - Aghanim |
| +150 Gold | 1 | 300 |
How imaginative you are. No one has ever asked for gold before. We better be careful here or this could start a dangerous trend. - Aghanim |
| Starting Potion | 1 | 1000 |
Having trouble staying alive in the Continuum Vault? Try one of these potions. No, no. Not here. I'll slip it to you when you enter the vault. I mean, it's nothing to be ashamed about, but people are so weird about these things. - Aghanim |
| +20% Bottle Movement Speed | 1 | 1000 |
Don't take this the wrong way, but if you can't juggle multiple mundane tasks while sprinting through the Continuum Vault, you're going to die even faster than I-- I mean, all of the other Aghanims thought. - Aghanim |
| +25% Attack Projectile Speed | 1 | 1000 |
This one's only for ranged heroes. I don't like discriminating against melee heroes any more than they like being discriminated against, but to make an exception here might tear through the very fabric of time and space. And I only do that for me. - Aghanim |
| +3 Starting Tome | 2 | 1000/3500 |
What if every time you entered the Continuum Vault, I could offer you a tome that grants +3 of your Primary Attribute? Wouldn't that be neat? - Aghanim |
| 10% Roshan Discount | 1 | 1000 |
All those other idiots fighting Roshan to gain immortality, take note. Diplomacy is such a lost art. But not for Roshan. He's old school. Really, really old school. Thought...it was probably a poor quality education. I mean, stealing from a shopkeeper? What a rube! - Aghanim |
| +1 Minor Shard Reroll | 3 | 1000/3000/3500 |
Don't like what Aghanim has to offer? Well, I could tell you where to stick your fragments. But since you're helping those other poor, defenseless, worthless, stupid, trapped Aghanims get out of the Continuum Vault... If you ask nicely, I just might let you choose something else. - Aghanim |
| +1 Max Lives | 1 | 2500 |
I suppose if you're fragile enough to be constantly dying, having the capacity for more life would be a boon, yes? Or is that wrong? Still trying to wrap my head around how weak and useless you generally are. - Aghanim |
| 10% Oracle Discount | 1 | 2000 |
Only a moron pays full price at that idiot fortune teller's stall. You have to demand a discount. Obviously I'm not expected to pay at all, but for you he might go as high as 10%. - Aghanim |
| -15% Death Time | 2 | 2000/2500 |
I didn't think you'd choose this one. I thought you enjoyed being dead. Based on my observations. - Aghanim |
| +15% Potion Healing | 1 | 2000 |
You're really building a tolerance to these things. I'd say you should cut back, but the timing on that's not very good for me right now. But right after we solve this conundrum dealie we'll definitely focus on you. I officially promise. - Aghanim |
| +8% Damage on Stunned Enemies | 1 | 2500 |
If there's one thing I know about battle, it's that it's really easy to win if you completely disable your opponent right from the start. They really hate it, as you might expect, but the best part is that you don't have to care about what they think. They're about to be dead! - Aghanim |
| +5 Boss Tome | 2 | 2500/3500 |
This one's nice. Whenever you defeat a boss, you'll find a tome that grants +5 of a random Attribute. I'm sure you'd like to choose said attribute, but I think a surprise is more fun. And since I have absolutely no control over it, I urge you to embrace the whole surprise angle. - Aghanim |
| +1 Shard Upgrade | 3 | 3500 |
Have you considered the benefits of randomly upgrading 1 of your Common Shards to Elite each game? We could make that happen. Just don't tell any of your friends. This one's special just for you. - Aghanim |
| +1 Strength | 4 | 300/600/1400/2000 |
Wonderful, your feats of strength will perhaps now be able to accomplish the bare minimum before you die, instead of even less! - Aghanim |
| +1 Agility | 4 | 200/600/1400/2000 |
Did you know that Aghanim was once known as Aghanim the Agile? In my younger days, of course. Sure, I could just magic myself up an Agility boost like I'm doing for you, but that just seems kind of pathetic, you know? Like trying to be something you're not. Or worse, trying to recapture something you'll never truly be again. It's sad, really. But here you go! - Aghanim |
| +1 Intelligence | 4 | 600/800/1400/1400 |
Oh, look! It thinks it's learning. How adorable. They're really so much like us, you know? Do you want to use the Continuum Device little budy? Do you? - Aghanim |
| +2% Evasion | 3 | 1000/1200/2000 |
You think I don't see right through you? The others might not see it, but you can't pull the wool over ol' Aghanim's eyes, friend. Not for a second. - Aghanim |
| +2% Magic Resistance | 4 | 800/1400/1400/2000 |
I am done hiding my feelings about magic resistance. If you don't have your own magic that can stop someone else's magic, then you've got no business getting into fights with people who can do magic in the first place. I mean, do you think some stupid Oglodi with an axe could just buy a fancy cloak and go toe to toe with a literal god and come out on top? It just doesn't happen. Or at least it shouldn't be allowed to happen if it does. - Aghanim |
| +1 Armor | 4 | 200/600/1400/2000 |
+1 Armor is a very nice blessing. It's not the blessing I would choose, but I wouldn't choose any of these blessings. For me, I'd break out the good stuff. - Aghanim |
| +3 Attack Damage | 2 | 200/600 |
Normally I wouldn't condone solving your problems with violence. But those are your problems. Here and now? With my problem? Absolutely by all means solve my problem with violence. This problem is special. It's like a little door with a tiny lock and that lock's key is missing down some inexplicably-placed drain. So the lock needs to be smashed. Smash the whole damn door down, even. We're not playing around here people. I didn't bring you here to laugh at your failure like before. - Aghanim |
| +10 Mana per Level | 3 | 300/600/800 |
With that extra +10 Mana per level, you should have enough to cast one of my spells in, ohh, 100,000 levels or so. - Aghanim |
| +10 Health Per Level | 2 | 1400/2000 |
You know, believe it or not, Aghanim the eloquent has been accused of rambling a time or two. Of course, I wouldn't admit to some level of conversational leadership when dealing with lesser minds. It's for everyone's benefit. Not only my own. But really, with everyone being a lesser mind... Well, you can probably see where I'm going with this. Unless you're one of the lesser lesser minds. And in that case why am I even wasting my time? Anyway, what were you asking about? This old thing? It gives +10 Health per level. Any idiot knows that. - Aghanim |
| +1 Regen by Allies | 3 | 200/600/1200 |
If there's one thing I always say, it's that you need to stick together. It is absolutely imperative. And definitely never, ever listen to someone you understandably look up to and trust if they tell you it's almost efficient to split up and explore the Continuum Vault individually. Even if he is the smartest and most handsome and definitely most regretful member of your party. In fact, to encourage you to stay near your friends, let's give you increased HP Regeneration when an ally stays within 300 range. If that doesn't keep you divas together, nothing will. - Aghanim |
| +4% Cleave | 2 | 300/1000 |
This one's only for the melee heroes, people. Everyone else can just go right back to the end of the line and think long and hard about why they tried to make such a terrible choice. - Aghanim |
| +20 Attack Range | 2 | 600/800 |
This one's only for ranged heroes. It has the word range right in the title. If you're a melee hero who tried to choose it anyway, shame on you. - Aghanim |
| +20 Cast Range | 2 | 600/600 |
Listen, I didn't want to say anything. But your cast range? It's way too short. You need to be like doubling, tripling, even quadrupling that baby. This isn't the silly battle of the ancients. The Continuum Vault is big league stuff. You don't even need to take my word for it. Search your very recent and no doubt numerous memories. If your enemies reach you before you can alakazam-boozle 'em, you're already dead. - Aghanim |
| +2% Spell Amp | 4 | 200/300/300/2000 |
I see you've got your eyes on that 2% Spell Amplification. Am I right in thinking someone's not packing enough punch to stay in the game? Well, we can fix that friend. We can fix that indeed. - Aghanim |
| +5% Debuff Duration | 3 | 200/600/1400 |
I like this request. Simple. Effective. Completely within my powers to grant. - Aghanim |
| +1s Invulnerability After Death | 2 | 600/1200 |
1 extra second of invulnerability after respawning? That sounds amazing! I mean, the dying part isn't great. Don't do that. But if you do, make sure to be invulnerable for a really long time after. - Aghanim |
| +15 Movespeed After Death | 3 | 600/600/1400 |
You know my feelings on dying. better you than me. But still pretty bad even when it's you. Because I've got to find another you. And that's a hassle none of us want. So why not take a little boost and get 15 extra speed while you're invulnerable after respawning. Do us both a favor. A second favor. In addition to the whole 'helping me save reality' thing. - Aghanim |
| +10 Attack Speed After Death | 4 | 600/600/800/1400 |
It's natural after someone kills you to want to roll around on the ground crying about it. But a better idea is to juice yourself up with 10 Attack Speed during your post-spawn invulnerability, and just wreck anyone who thought to put you in your obviously appropriate place. - Aghanim |
| +5% Potion Mana | 3 | 1000/1400/1400 |
Every wizard remembers the first time they ran out of mana. And every great wizard remembers the last time they ran out. Because, you know, they made sure it didn't happen again. I only clarify that last part because it I realize it could sound like they remember the last time it happened because the last time it happened was recently or something like that. But it wasn't. It was a very, very long time ago. And it was barely even a thing. Nothing bad happened, and there were even a few laughs. Everyone walked away a better person, too. Which is what's really important. - Aghanim |
| +4% Damage when low | 2 | 1400/1400 |
You've got that 'never say die' look about you. I can see it in your eyes. When the chips are down, that's your time. That's when you unleash the beast. That beast that feasts on all other beasts. Even the big, scary beasts that we trust are not hunting to kill us at this very moment. None of them can sniff your beast's droppings. No, not with your beast appearing when your health drops below 20% to dish out extra damage. In fact, the only knock on your wonderful beast is that it doesn't stick around all the time. It's just so much cooler and deadlier than you. - Aghanim |
| +50 Gold | 4 | 300/800/1400/2000 |
How imaginative you are. No one has ever asked for gold before. We better be careful here or this could start a dangerous trend. - Aghanim |
| 10% Bottle Movement Speed | 1 | 1400 |
Don't take this the wrong way, but if you can't juggle multiple mundane tasks while sprinting through the Continuum Vault, you're going to die even faster than I-- I mean, all of the other Aghanims thought. - Aghanim |
| +4% Damage on Stunned Enemies | 1 | 600 |
If there's one thing I know about battle, it's that it's really easy to win if you completely disable your opponent right from the start. They really hate it, as you might expect, but the best part is that you don't have to care about what they think. They're about to be dead! - Aghanim |
| 5% Oracle discount | 1 | 2000 |
Only a moron pays full price at that idiot fortune teller's stall. You have to demand a discount. Obviously I'm not expected to pay at all, but for you he might go as high as 5%. - Aghanim |
| 5% Roshan discount | 1 | 1400 |
All those other idiots fighting Roshan to gain immortality, take note. Diplomacy is such a lost art. But not for Roshan. He's old school. Really, really old school. Thought...it was probably a poor quality education. I mean, stealing from a shopkeeper? What a rube! - Aghanim |
Achievements[]
| Name | Activity | Battle Points |
|---|---|---|
| LOOK AT YOU! | Defeat Aghanim in Apprentice Level Aghanim's Labyrinth | 500 |
| THAT WAS IMPRESSIVE-ISH! | Defeat Aghanim in Magician Level Aghanim's Labyrinth | 1000 |
| ONE FINAL TEST REMAINS! | Defeat Aghanim in Sorcerer Level Aghanim's Labyrinth | 2000 |
| AGHANIM THE PROUD | Defeat Aghanim in Grand Magus Level Aghanim's Labyrinth | 3000 |
| THE APEX MAGE | Defeat Aghanim in Apex Mage Level Aghanim's Labyrinth | 5000 |
- The achievements are hidden but will trigger as soon as you completed the activity needed.
Lore[]
Voice announcer[]
Intro[]
Dialogue[]
Trailer[]
Trailer[]
Gallery[]
Trivia[]
- Aghanim's (the announcer) voice actor is Rich Sommer.
- This event uses many assets from the Siltbreaker event as well as the previous Aghanim's Labyrinth event.
External links[]
| |||||||||||||||||